1. Selelekela
The ESSLNB Night Vision Monocular 5X40 is a versatile digital optical instrument designed for observation in both complete darkness and low-light conditions. Equipped with an infrared illuminator, it allows for clear viewing, photo capture, and video recording of subjects up to 984 feet away. This manual provides detailed instructions for the proper setup, operation, and maintenance of your device to ensure optimal performance and longevity.
2. Sehlahisoa Overview
2.1 Likaroloana le Litaolo
Familiarize yourself with the main components and controls of your ESSLNB Night Vision Monocular:

Figure 2.1: Monocular Components Diagram
This diagram illustrates the key parts of the monocular, including the objective lens, focusing wheel, infrared fill light, control buttons, battery compartment, TFT LCD screen, strap attachment point, tripod adapter, and Type-C port.
- Sepheo: The main lens for gathering light.
- Objective focusing hand-wheel: Used to adjust the focus for clear images.
- Infrared fill light: Emits infrared light for viewho kena lefifing.
- Up key/Infrared light up key / electronic zoom up key: Increases IR level or digital zoom.
- Down key/Infrared light down key / electronic zoom down key: Decreases IR level or digital zoom.
- Photo, video, playback, function mode keys: Buttons for selecting modes and functions.
- Power switch / function confirmation OK key: Turns the device on/off and confirms selections.
- Betri: Rechargeable power source.
- TFT LCD screen: E bontša e phelang view, captured images, and videos.
- Leqhoele: For secure handling.
- Adapter ea Tripod: 1/4-inch screw thread for mounting on a tripod.
- Slot ea karete ea TF: For inserting the memory card.
- Typ-c: USB Type-C port for charging and data transfer.
2.2 Lisebelisoa tse kenyellelitsoeng
Your package includes the following items:

Setšoantšo sa 2.2: Lisebelisoa tse kenyelelitsoeng
The image displays the packaging box, the night vision monocular, a backpack/carrying case, a tote bag, a USB output line, a charger, the rechargeable battery, a cleaning cloth, a card reader, a 32GB TF card, and the instruction manual.
- Night Vision Monocular
- Betri e ka nchafatsoang
- Ho Jara Mokotla
- Cable ea USB
- Charger
- Ho Hloekisa Lesela
- 16G/32G TF Card (pre-installed or included)
- Sebali sa Karete
- Bukana ea Mosebelisi
3. Seta
3.1 Ho Kenya le ho tjhaja Betri
The monocular uses a rechargeable battery. Ensure it is fully charged before first use.
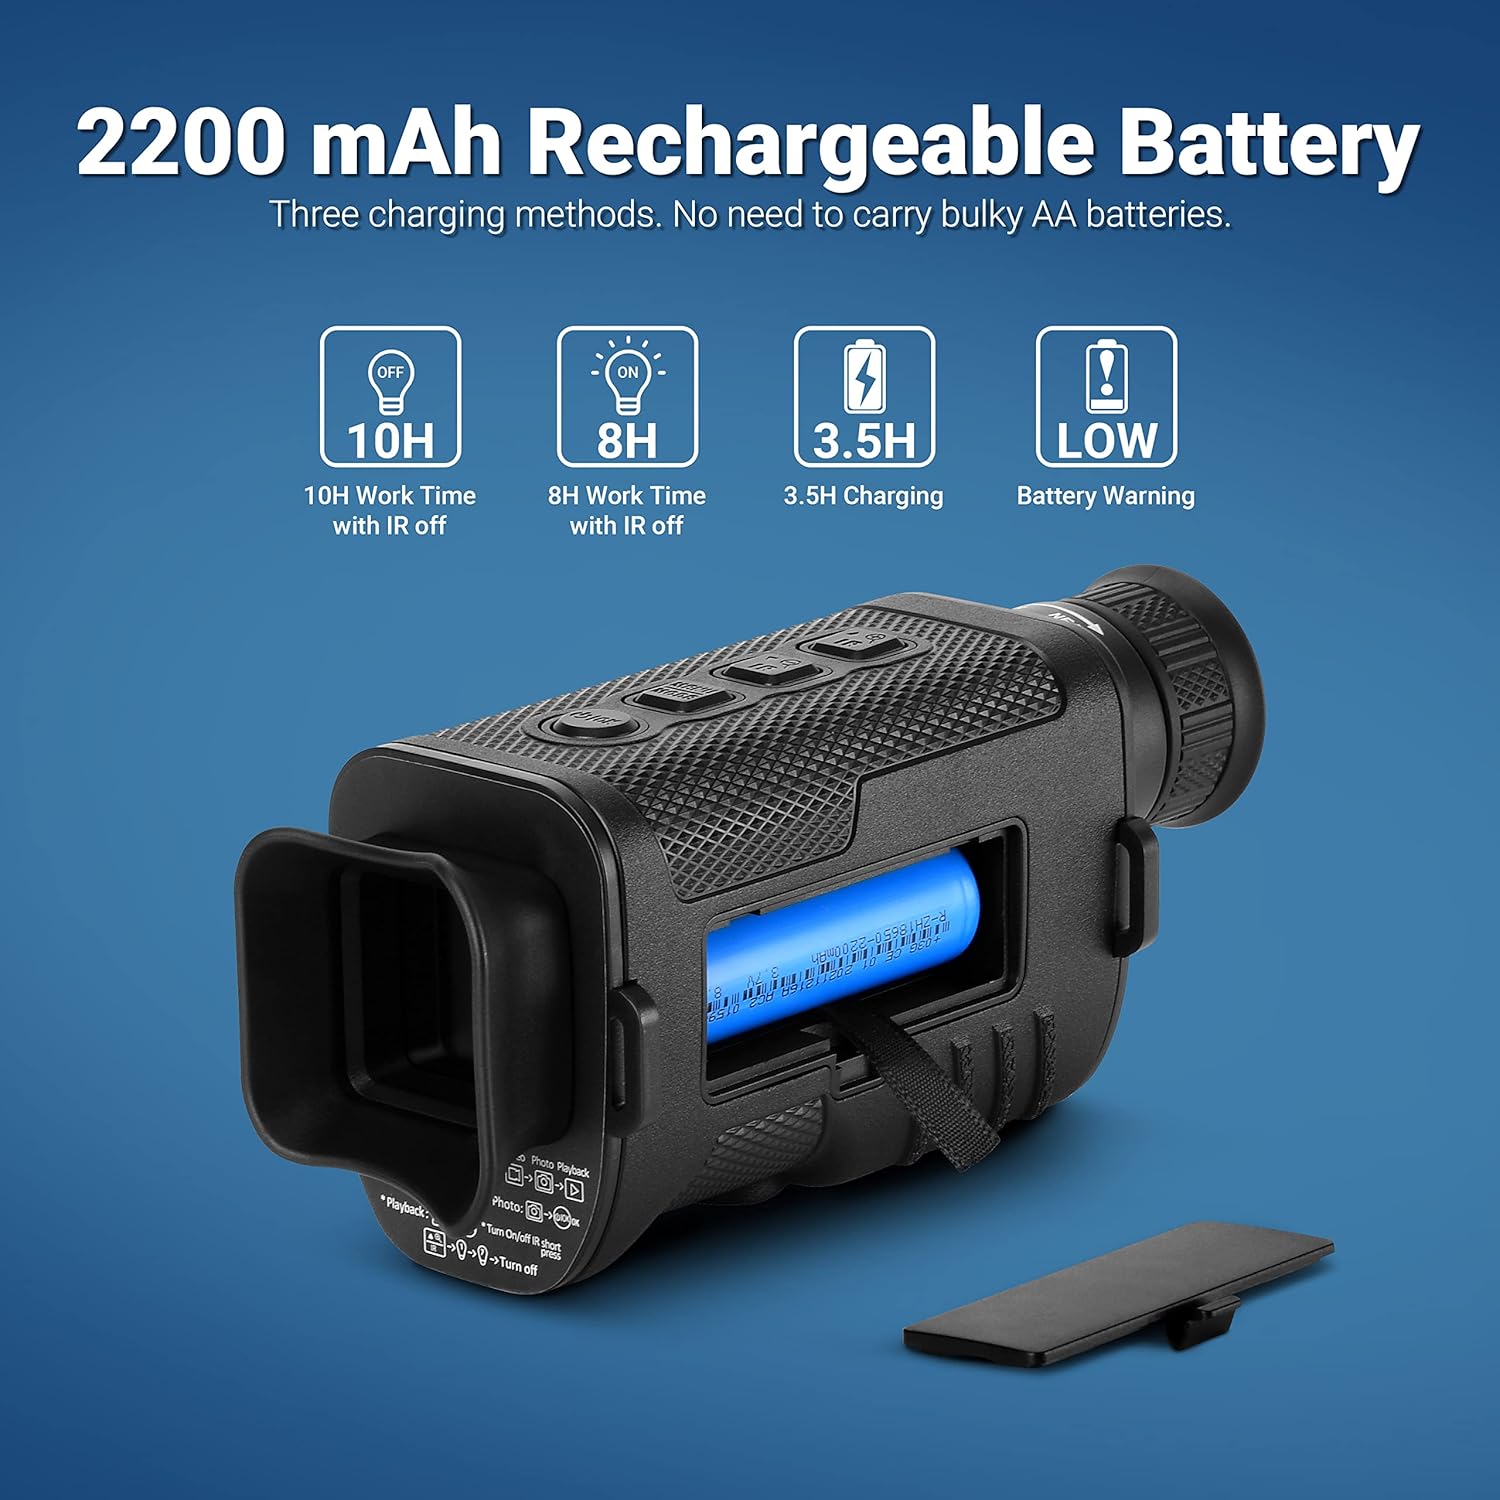
Setšoantšo sa 3.1: Betri le ho tjhaja
This image illustrates the 2200 mAh rechargeable battery, its placement in the monocular, and three charging methods: direct charging via USB, charging the battery externally with the provided charger, and charging via a power bank (not included).
- Bula sekwahelo sa karolo ya betri.
- Insert the provided rechargeable battery, ensuring correct polarity.
- Koala sekoaelo sa karolo ea betri ka mokhoa o sireletsehileng.
- To charge, connect the monocular to a power source using the supplied USB cable and charger. The charging time is approximately 3.5 hours.
- A full charge provides approximately 10 hours of work time with IR off, and 8 hours with IR on. A low battery warning will be displayed when power is critical.
3.2 Ho kenya TF Card
A TF (Micro SD) card is required to store photos and videos. The device supports up to a 128GB TF card.
- Locate the TF card slot (refer to Figure 2.1, component 12).
- Gently insert the TF card into the slot until it clicks into place. Ensure the correct orientation.
- To remove, gently push the card in, and it will spring out.
4. Litaelo tsa Ts'ebetso
4.1 Ho Bulela/Ho tima
- Ho kenya matla, tobetsa o hatelle Phetoho ea matla (component 7) until the screen illuminates.
- Ho tima motlakase, tobetsa o hatelle Phetoho ea matla again until the screen turns off.
4.2 Tsepamiso
Adjust the focus for a clear image:

Figure 4.1: Focusing Mechanism
This image highlights the FMC (Fully Multi-Coated) lens and the objective focusing hand-wheel, indicating how to rotate it to achieve clear focus. It also points out the infrared fill light.
- While looking through the eyepiece, rotate the Objective focusing hand-wheel (component 2) until the image on the TFT LCD screen appears sharp and clear.
4.3 Infrared (IR) Illumination Adjustment
The monocular features a 7-level adjustable infrared illuminator for optimal viewing in varying darkness levels.

Figure 4.2: Infrared Level Adjustment
This image demonstrates the visual difference between various infrared levels (1, 3, 5, 7), showing how higher levels provide clearer visibility in complete darkness.
- Tobetsa ea Up key/Infrared light up key (component 4) to increase the IR level.
- Tobetsa ea Down key/Infrared light down key (component 5) to decrease the IR level.
- Higher IR levels provide brighter images in total darkness but consume more battery.
4.4 Mosebetsi oa Zoom
The monocular offers 2X optical magnification and up to 8X digital zoom.

Figure 4.3: Optical and Digital Zoom
This image illustrates the effect of 2X optical magnification and various digital zoom levels (1X, 3X, 5X, 8X) on the observed target, showing increased detail with higher zoom.
- Sebelisa le Up key/electronic zoom up key (component 4) to increase digital zoom.
- Sebelisa le Down key/electronic zoom down key (component 5) to decrease digital zoom.
- Note that digital zoom may reduce image clarity at higher magnifications.
4.5 Photo and Video Recording
Capture high-quality 1080P FHD videos and photos.

Figure 4.4: Photo and Video Quality
Setšoantšo sena se bonts'a examples of the high-quality 1080P FHD video and 720P photo output from the monocular, demonstrating clear capture of subjects.
- Tobetsa ea Senotlolo sa mode (component 6) to switch between Photo mode and Video mode.
- Ka Mokgwa wa foto, tobetsa Senotlolo sa lifoto (component 6) to take a picture.
- Ka Video mode, tobetsa Senotlolo sa video (component 6) to start recording. Press again to stop recording.
4.6 Playback Function
Review your captured photos and videos directly on the device.
- Tobetsa ea Senotlolo sa ho bapala (component 6) to enter playback mode.
- Use the Up/Down keys (components 4 & 5) to navigate through your files.
- Tobetsa ea OK senotlolo (component 7) to view foto kapa bapala video.
- Press the Playback key again to exit playback mode.
4.7 Day and Night Use
The monocular is designed for versatile use in various lighting conditions.

Figure 4.5: Day and Night Operation
This image visually contrasts the monocular's performance during the day (color image) and at night (black and white image with IR illumination), demonstrating its ability to function effectively in both environments.
- During daytime, the monocular operates in full color without the need for infrared illumination.
- At night or in low-light conditions, activate the infrared illuminator to view subjects in black and white. Adjust the IR level as needed for clarity.
5. Tlhokomelo
- Ho hloekisa lilense: Use the provided cleaning cloth or a soft, lint-free cloth specifically designed for optical lenses. Gently wipe the objective lens and eyepiece. Do not use abrasive materials or harsh chemicals.
- Ho Hloekisa 'Mele: Wipe the monocular's body with a soft, damp lesela. Qoba mongobo o feteletseng.
- Polokelo: When not in use, store the monocular in its carrying bag in a cool, dry place, away from direct sunlight and extreme temperatures. Remove the battery if storing for extended periods.
- Tlhokomelo ea Betri: Recharge the battery regularly, even if not in frequent use, to maintain its lifespan. Avoid fully discharging the battery.
6. Ho rarolla mathata
| Bothata | Lebaka le ka khonehang | Tharollo |
|---|---|---|
| Sesebelisoa ha se sebetse. | Betri e felile kapa e kentsoe ka phoso. | Charge the battery fully. Ensure the battery is inserted with correct polarity. |
| Setšoantšo se lerootho. | Focus is not adjusted correctly. Lens is dirty. | Rotate the objective focusing hand-wheel until the image is clear. Clean the objective lens with a soft cloth. |
| Poor visibility in darkness. | IR illuminator is off or set to a low level. | Increase the IR level using the Up key. Ensure IR is enabled. |
| Ha e khone ho nka linepe/livideo. | TF card is full, not inserted, or corrupted. | Check TF card storage. Reinsert TF card. Format TF card (this will erase data). Try a different TF card. |
| Bophelo ba betri e khutšoanyane. | Frequent use of high IR levels. Battery degradation. | Reduce IR level when not necessary. Ensure battery is fully charged. Consider replacing battery if it's old. |
7. Litlhaloso
| Sebopeho | Lintlha |
|---|---|
| Lebitso la Mohlala | Night Vision Monocular |
| Boikemisetso ba lense bophara | 25 limilimithara |
| Khaliso ea Optical | 2X |
| Nyenyefatsa Digital | Ho fihlela ho 8X |
| Leseli la Infrared | 3W Infrared LED, 850nm, 7 Levels Adjustable |
| Viewing Distance (Darkness) | Ho fihla ho maoto a 984 (300 metres) |
| Viewing Distance (Daytime) | 2 metres ho isa ho infinity |
| Hlahisa skrine | LCD ea TFT ea lisenthimithara tse 1.5 |
| Qeto ea Lifoto | 1080P FHD |
| Qeto ea Video | 1080P FHD (1920*1080P) |
| Polokelo | Supports up to 128GB TF Card (32GB included) |
| Mofuta oa Leshala | Rechargeable Lithium Ion (2200 mAh) |
| Bophelo ba Battery | Approx. 10 hours (IR off), 8 hours (IR on) |
| Nako ea ho tjhaja | Hoo e ka bang. Lihora tse 3.5 |
| Boima ba Ntho | 9.12 lik'hilograma |
| Litekanyo (LxWxH) | 6.3 x 2.76 x 2.17 lisenthimithara |
| Lintho tse bonahalang | Setala sa Acrylonitrile Butadiene |
8. Boitsebiso ba Tiisetso
The ESSLNB Night Vision Monocular 5X40 comes with a manufacturer's warranty. Please refer to the warranty card included in your product packaging or contact ESSLNB customer support for specific details regarding warranty coverage and duration.
9. Tšehetso ea Bareki
For any questions, technical assistance, or support regarding your ESSLNB Night Vision Monocular, please contact ESSLNB customer service. Contact information can typically be found on the product packaging, the official ESSLNB websebaka sa marang-rang, kapa ka sebaka seo u se rekileng.
You may also visit the official ESSLNB Store for more information and product updates: ESSLNB Amazon Store


