1. Selelekela
This manual provides detailed instructions for the setup, operation, and maintenance of your JoFomp 17.3" Large Digital Wall Clock. Please read this manual thoroughly before use to ensure proper functionality and longevity of the product.
2. Boitsebiso ba Tšireletseho
- Ensure the clock is connected to a stable power source (5V/2A adapter included).
- Se ke oa beha sesebelisoa mochesong o feteletseng, mahlaseling a letsatsi, kapa mongobo o phahameng.
- Boloka moo bana ba ka fihlang teng.
- Se ke oa leka ho qhaqholla kapa ho lokisa sesebelisoa ka bouena. Ikopanye le tšehetso ea bareki bakeng sa thuso.
- Taolo e hole e hloka libeteri tse 2 tsa AAA (tse sa kenyelletsoeng).
- A 1 AAA battery (not included) is required for the memory function to retain settings during power outages.
3. Likahare tsa Sephutheloana
Netefatsa hore lintho tsohle li teng ka har'a sephutheloana:
- JoFomp 17.3" Digital Wall Clock
- Remote Control
- 5V/1A DC Adapter ea Matla
- Mohala oa Matla
- Mounting Hooks (2)
- Mounting Template Ruler
- Bukana ea mosebelisi (tokomane ena)

Setšoantšo sa 3.1: Ho kenyelelitsoe lisebelisoa le yuniti e kholo.
4. Sehlahisoa Overview
The JoFomp 17.3" Large Digital Wall Clock features a clear LED display and multiple functions for convenience.

Figure 4.1: Front display of the digital wall clock.
4.1 Likarolo tsa Pontšo
- Pontšo ea Nako: Large 17.3" LED digits.
- Hlahisa Letsatsi: Month and Day.
- Letsatsi la Beke: Indicated by illuminated text (Mon-Sun).
- Mocheso: Displays in Celsius or Fahrenheit.
- Mongobo: Displays relative humidity percentage.
- Lialamo tse peli: Litlhophiso tse peli tsa alamo tse ikemetseng.
- Lesupa la DST: Daylight Saving Time status.

Figure 4.2: Labeled display functions.
4.2 Back Panel and Buttons
The back of the clock houses control buttons and connection ports.

Figure 4.3: Back panel with labeled components.
- Likonopo tsa ho seta: Five buttons for manual adjustments (Light, SET, +, -, Alarm).
- Memory Battery Compartment: For 1 AAA battery (not included) to retain settings.
- Port ea Matla: Bakeng sa ho hokahanya adaptara ea motlakase.
- Ho Hōlisa Likoti: For wall installation.
5. Seta
5.1 Khokelo ea Matla
- Connect the power cord to the clock's power port.
- Plug the 5V/2A power adapter into a standard electrical outlet. The clock will power on and display.
Hlokomela: The clock requires continuous power to operate. It is not battery-powered for primary display.
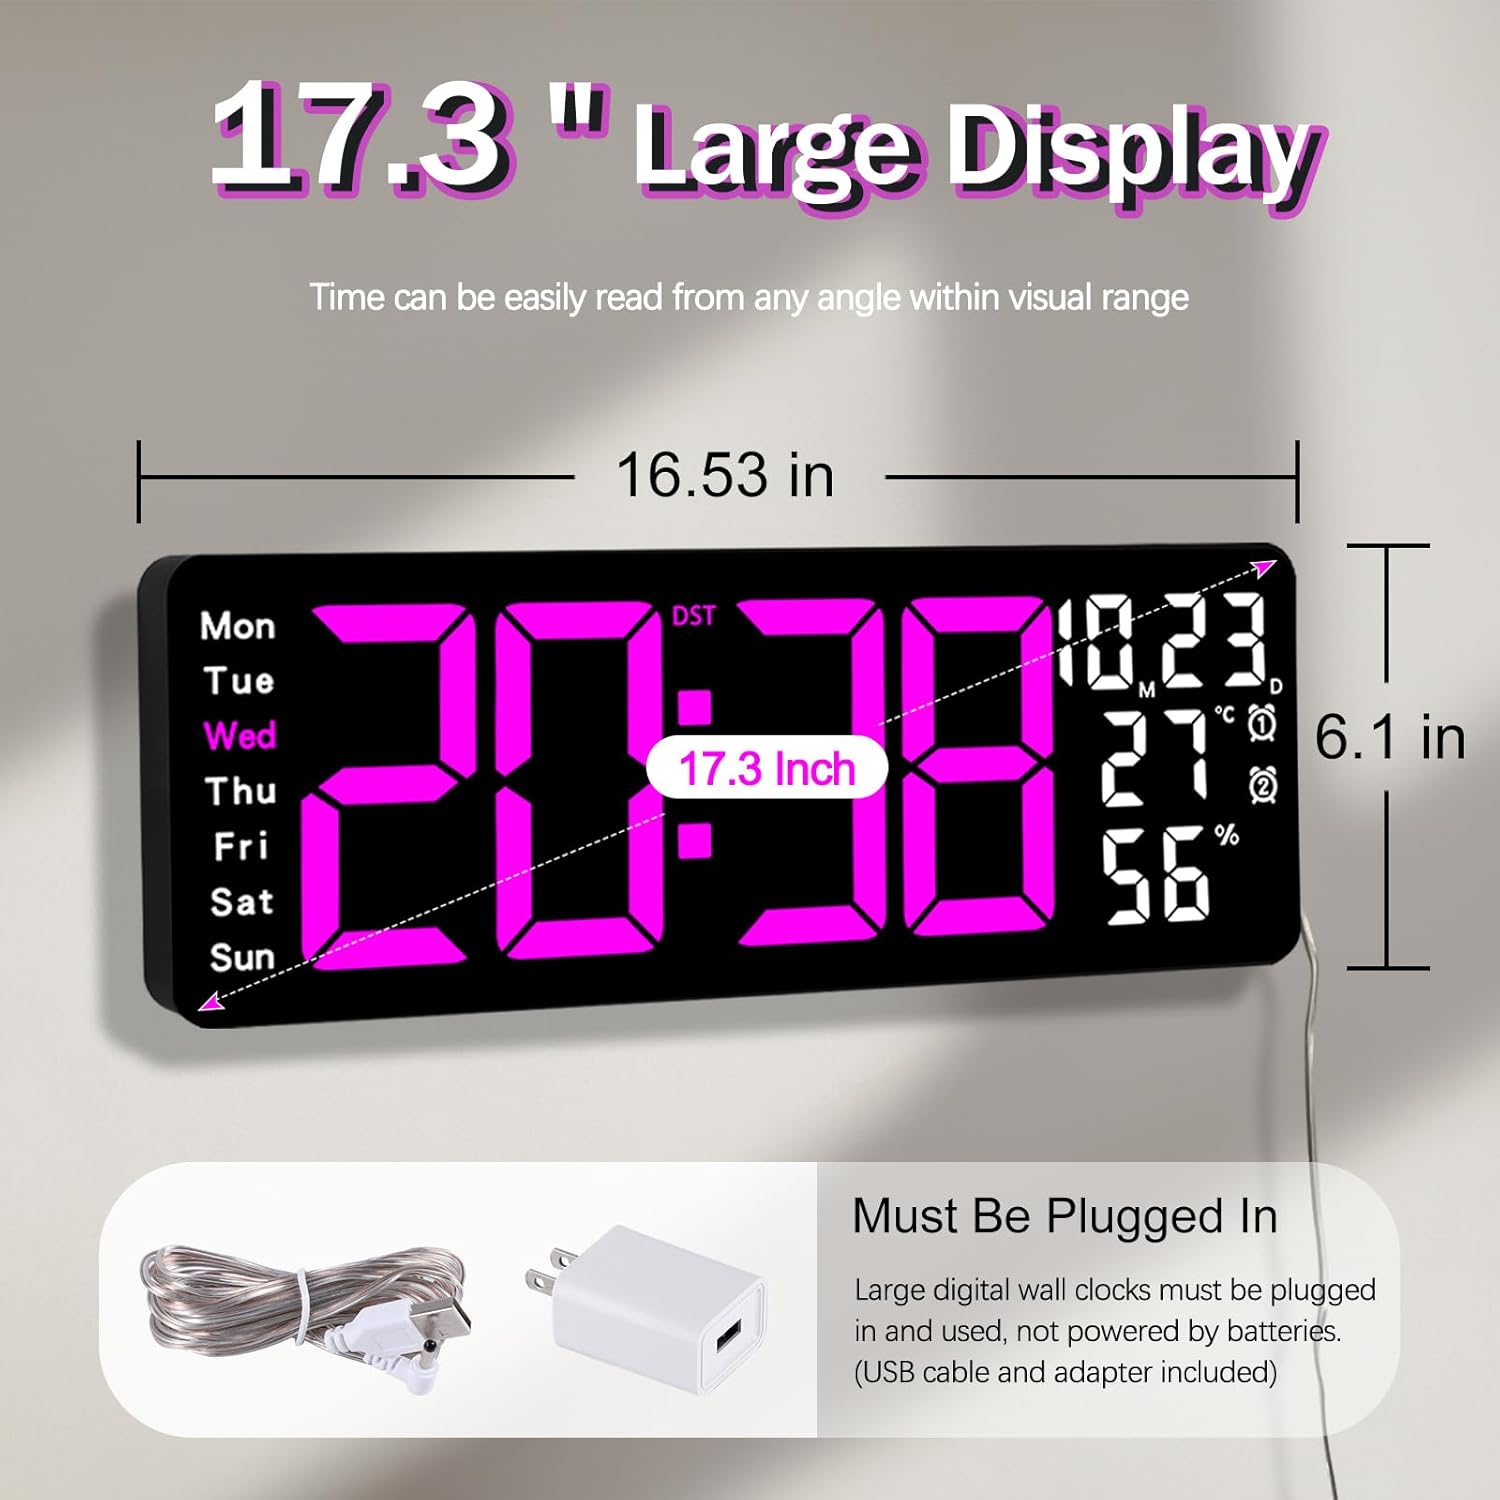
Figure 5.1: Power connection and dimensions.
5.2 Memory Battery Installation (Optional)
To retain time and settings during a power outage, install a 1 AAA battery (not included) into the memory battery compartment on the back of the clock.
- Locate the memory battery compartment on the back of the clock.
- Bula sekoahelo sa phaposi.
- Insert one 1.5V AAA battery, ensuring correct polarity (+/-).
- Koala sekoaelo sa phaposi ka mokhoa o sireletsehileng.
5.3 Ho Hloma Lebota
Use the included mounting template ruler and hooks for easy wall installation.
- Determine the desired location for your clock.
- Place the mounting template ruler on the wall at the desired height.
- Mark the positions for the mounting hooks according to the ruler's indications.
- Install the mounting hooks into the wall at the marked positions.
- Carefully hang the clock onto the installed hooks, ensuring it is level and secure.
6. Litaelo tsa Ts'ebetso
The clock can be operated using either the remote control or the buttons on the back.
6.1 Tlhophiso ya Nako le Letsatsi
Use the remote control or the "SET" button on the back of the clock.
- Tobetsa ea HLOKOMELA button (on remote or back of clock) to enter setting mode.
- Sebelisa le + le - dikonopo ho fetola boleng ba ho benya (mohlala, hora, motsotso, selemo, kgwedi, letsatsi).
- Tobetsa HLOKOMELA again to confirm the current setting and move to the next parameter.
- Repeat until all settings are configured.
6.2 12/24 Hour Format Conversion
To switch between 12-hour and 24-hour time formats:
- Tobetsa e inehetseng 12/24H konopo ea remote control.
- Alternatively, during time setting, the format option will appear.

Figure 6.1: 12/24H format conversion.
6.3 Temperature Unit Conversion (°C/°F)
Ho fetola lipakeng tsa mocheso oa Celsius le Fahrenheit:
- Tobetsa ea ° C / ° F. konopo ea remote control.
6.4 Seta ea Alamo (Lialamo tse peli)
The clock supports two independent alarms.
- Tobetsa ea TLHOKOMELO button on the remote control or the back of the clock.
- Sebelisa + le - ho seta nako ya alamo e batloang.
- Tobetsa TLHOKOMELO again to confirm and move to the next alarm or exit.
- To activate/deactivate an alarm, press the corresponding alarm button (e.g., AL1 or AL2) ho remoutu.
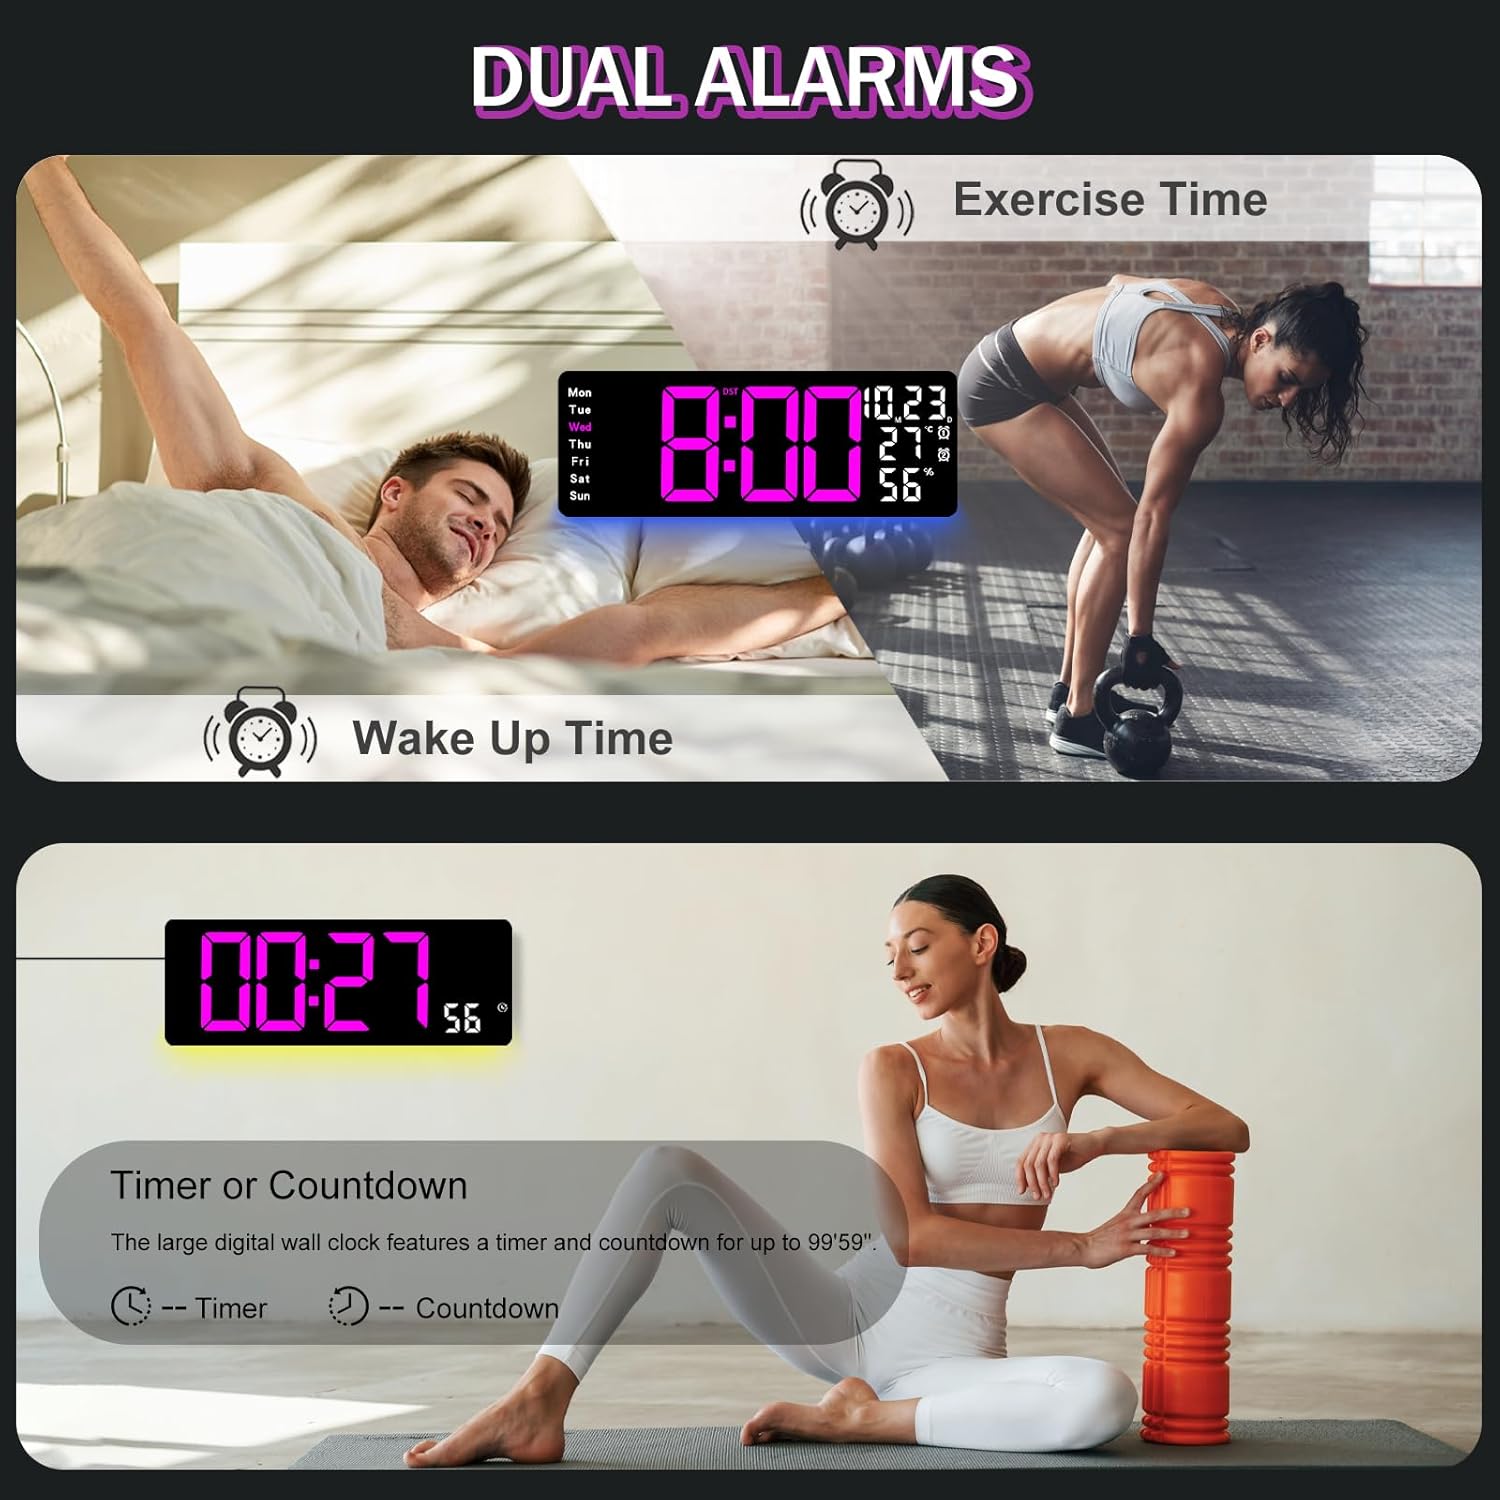
Figure 6.2: Dual alarm and timer functions.
6.5 Phetoho ea Khanya
The clock offers 10 levels of brightness, adjustable manually or automatically.
- Khanya e Ikemetseng: The built-in light sensor adjusts brightness based on ambient light. Activate this mode by pressing the MOSEBETSI konopo ho remote.
- Khanya ea letsoho: Tobetsa ea KHANYA button on the remote, then use + le - to select one of the 10 levels.

Figure 6.3: Custom and auto-brightness settings.

Figure 6.4: Brightness regulator illustration.
6.6 Ambient Light Features
The clock includes a night light feature at the bottom with multiple color options.
- Tobetsa ea KHANYA button on the remote control or the back of the clock to cycle through 8 fixed colors and 1 multi-color mode.
- In multi-color mode, the colors automatically convert. Press OK to fix a favorite color.
- Adjust the brightness of the ambient light using the + le - buttons when the ambient light is active.

Figure 6.5: Multiple ambient night light options.

Figure 6.6: 9 color ambient light options.
6.7 Timer and Countdown Function
The clock features a timer (count-up) and countdown function up to 99 minutes and 59 seconds.
- Tobetsa ea TIMER konopo ea remote control.
- Sebelisa + le - to set the desired time for countdown.
- Tobetsa QALA/EMA to begin or pause the timer/countdown.
- Tobetsa RETS'ELISITSOE ho phumula sebala nako.

Figure 6.7: Timing function (count-up/countdown).
Video 6.1: Demonstration of multi-functional features including night light change, brightness control, count-up, and countdown. This video also shows the time, date, day, alarm clock, temperature, and humidity displayed on the same screen, along with 12/24 hour conversion, Celsius/Fahrenheit conversion, and DST enablement. The back design and buttons are also briefly shown.
6.8 Daylight Saving Time (DST)
If DST is observed in your region, you can enable or disable it.
- Tobetsa nako e telele - button on the remote control to enable or disable DST. The DST indicator will appear/disappear on the display.

Figure 6.8: Enabling and disabling Daylight Saving Time.

Figure 6.9: Daylight Saving Time (DST) functionality.
6.9 Tšebeliso ea Remote Control
The remote control provides convenient access to all clock functions without needing to reach the clock directly.

Figure 6.10: Remote control and its functions.

Figure 6.11: Remote control in use.
- Ensure the remote control has 2 AAA batteries installed (not included).
- Point the remote control directly at the clock for optimal response.
- Each button on the remote corresponds to a specific function as described in this manual.
7. Tlhokomelo
- Clean the clock's display and body with a soft, dry cloth. Avoid abrasive cleaners or solvents.
- Ensure the power adapter and cord are free from damage.
- Replace the memory battery annually to ensure settings are retained during power interruptions.
8. Ho rarolla mathata
| Bothata | Lebaka le ka khonehang | Tharollo |
|---|---|---|
| Pontšo ea oache e timme. | Ha ho phepelo ea motlakase. | Check if the power adapter is securely plugged into the clock and the outlet. Ensure the outlet is functional. |
| Remote control ha e sebetse. | Low or dead batteries in remote; obstruction; remote out of range. | Replace remote batteries (2 AAA). Ensure no obstructions between remote and clock. Point directly at the clock within effective range. |
| Litlhophiso li lahlehile kamora ho felloa ke matlatage. | No memory battery or dead memory battery. | Install a fresh 1.5V AAA battery in the memory compartment. |
| Incorrect temperature/humidity reading. | Sensor interference or placement. | Ensure the clock is not placed near heat sources, direct sunlight, or in areas with extreme drafts. Allow time for the sensor to stabilize. |
| Ambient light not changing colors. | Stuck in fixed color mode. | Press the LIGHT button on the remote to cycle through modes. If stuck on a fixed color, press the OK button to release it from fixed mode. |
9. Litlhaloso
| Sebopeho | Lintlha |
|---|---|
| Brand | JoFomp |
| Nomoro ea Mohlala | 6669 |
| Mofuta oa Pontšo | Digital LED |
| Boholo ba Pontšo | 17.3 inch |
| Litekanyo tsa Sehlahisoa | 16.5"W x 6.7"H |
| Mohloli oa Matla | Corded Electric (5V/2A adapter included) |
| Battery ea memori | 1 x AAA (ha e kenyelelitsoe) |
| Maemo a Khanya | 10 (Auto/Manual) |
| Ambient Light Colors | 8 Fixed + 1 Multi-color |
| Likarolo Tse Khethehileng | Large Display, Adjustable Brightness, Temperature Display, Humidity Display, Dual Alarms, Timer, Countdown, DST, Remote Control |
| Mofuta oa ho Beha | Thaba ea Lerako |
| Boima ba Ntho | 1.95 liponto |
10. Tiisetso le Tšehetso
JoFomp products are designed for reliability and performance. For warranty information or technical support, please refer to the contact details provided with your purchase or visit the official JoFomp websebaka. Boloka rasiti ea hau ea theko e le bopaki ba hore u rekile.