1. Selelekela
This manual provides detailed instructions for the installation, operation, and maintenance of your Stinger Audio MT-1000.1M 1-Channel Monoblock Marine Audio Subwoofer Amplifier. Please read this manual thoroughly before attempting installation or operation to ensure proper use and to prevent damage to the unit or your audio system. Keep this manual for future reference.
2. Sehlahisoa Overview
The Stinger Audio MT-1000.1M is a high-efficiency Class-D monoblock amplifier designed for marine environments. It delivers 1000 Watts RMS of power, optimized for subwoofer applications. Its robust, water-resistant design ensures reliable performance in challenging conditions.
Likarolo tsa Bohlokoa:
- Digital Class-D Monoblock Amplifereletsi: High efficiency and compact form factor.
- Moralo o Ikopanyeng le o tiileng: Built for lasting reliability.
- Robust Unregulated Power Supplies: Designed for superior performance and efficiency.
- Advanced HEXFET Power MOSFET: Features reduced on-resistance, faster switching speeds, and enhanced reliability.
- Direct Insert Power and Speaker Terminals: Decreased resistance for higher power transfer and efficiency.
- Moralo o Hanela Metsi: E sireletsa amplifier against weather elements for uninterrupted performance.
- Bass Boost Q: Adjustable bass boost from 0dB to 12dB at a selected frequency.
- Remote Bass Knob Included: Flush-mount design for effortless bass level adjustment.

3. Boitsebiso ba Tšireletseho
Kamehla ela hloko mehato e latelang ea tšireletso:
- Disconnect the vehicle's negative battery terminal before any installation.
- Netefatsa hore foreimi ea koloi e tsitsitse hantle.
- Use appropriate gauge wiring for power, ground, and speaker connections.
- Kenya le amplifier in a well-ventilated area, away from direct heat sources.
- Qoba ho phahamisa amplifier in locations where it may be submerged in water, despite its water-resistant rating.
- Ikopanye le setsebi sa ho instola haeba o sa tiisehe ka karolo efe kapa efe ea ts'ebetso ea ho instola.
4. Se ka Lebokoseng
Netefatsa hore lintho tsohle li teng pele o qala ho kenya:
- 1000 Watt Monoblock Amplifier (MT-1000.1M)
- Remote Level Control (Bass Knob)
- Mounting Hardware
- Buka ea Tataiso
5. Boitsebiso ba Karolo
Itloaetse ho amplifier's controls and connections.

5.1 Control Panel (Input Side)

- POWER/PRT/CLIP Indicators: LEDs indicating power status, protection mode, and signal clipping.
- REMOTE Port: RJ11 connection for the included remote bass level control.
- KEPO (RCA): Audio input from your head unit or source.
- BRIDGE IN/OUT (RCA): For linking multiple amplifiers.
- GAIN Taolo: Adjusts the input sensitivity to match the output of your source unit.
- LPF (Low-Pass Filter) Control: Adjusts the upper frequency limit for the subwoofer. Range: 40Hz - 180Hz.
- SUBSONIC Filter: Removes ultra-low frequencies below the audible range to protect the subwoofer. Range: OFF - 50Hz.
- FREQ (Bass Boost Frequency) Control: Selects the center frequency for the bass boost. Range: 30Hz - 80Hz.
- BOOST (Bass Boost Level) Control: Adjusts the level of bass boost. Range: 0dB - 12dB.
5.2 Terminal Panel (Output Side)

- GND (E fatše) Theminale: Connects to the vehicle's chassis ground.
- REM (Remote) Theminale: Connects to the remote turn-on lead from your source unit.
- +12V (Power) Terminal: Connects to the positive terminal of the vehicle's battery via an inline fuse.
- MONO OUTPUT (Speaker Terminals): Connects to your subwoofer(s). Minimum impedance 1 Ohm.
6. Ho kenya
Proper installation is crucial for optimal performance and safety. Ensure all connections are secure and correctly polarized.
Sebaka sa Mounting
Choose a mounting location that is secure, provides adequate ventilation, and is protected from excessive moisture. While the amplifier is water-resistant, direct exposure to heavy water spray or submersion should be avoided.

6.2 Mahokelo a Wiring
- Matla (B+): Connect a 4-gauge power cable from the +12V terminal of the amplifier directly to the positive terminal of the vehicle's battery. Install an appropriate inline fuse (100A recommended) within 18 inches of the battery.
- Motheo (GND): Connect a 4-gauge ground cable from the GND terminal of the amplifier to a clean, bare metal point on the vehicle's chassis. Ensure a solid, low-resistance connection.
- Hole (REM): Connect a 18-gauge remote turn-on wire from the REM terminal of the amplifier to the remote output of your head unit.
- Kenyelletso ea RCA: Connect RCA cables from the subwoofer output of your head unit to the INPUT RCA jacks on the ampmoqhobi.
- Sephetho sa sebui: Connect your subwoofer(s) to the MONO OUTPUT terminals. Ensure the total impedance is not below 1 Ohm. Observe correct polarity (+ to + and - to -).
- Remote Bass Knob: Hokela konopo ea bass e hole le koung ea REMOTE ho amplifier using the provided cable.
7. Ts'ebetso
After installation, follow these steps to configure and operate your ampmoqhobi.
7.1 Tlhophiso ea Pele le Phetoho ea Katleho
- Bulela taolo ea GAIN ho amplifier ho fihlela boemong ba eona bo tlase (ho ya ka lehlakoreng le leng la oache).
- Beha bophahamo ba modumo ba yuniti ya hao ya hlooho ho hoo e ka bang 75% ya boemo ba yona bo phahameng ka ho fetisisa.
- Play a dynamic piece of music with strong bass content.
- Butle-butle eketsa taolo ea GAIN ho amplifier until you hear distortion, then back it off slightly until the sound is clear. The CLIP indicator should not illuminate continuously.
7.2 Crossover and Filter Settings
- LPF (Sesefo sa Low-Pass): Adjust the LPF control to set the upper frequency limit for your subwoofer. A common starting point is 80Hz-100Hz, but this may vary depending on your subwoofer and other speakers in your system.
- SUBSONIC Filter: Set the SUBSONIC filter to protect your subwoofer from playing frequencies below its resonant frequency. A common setting is 25Hz-30Hz, or slightly below your subwoofer's tuning frequency if it's in a ported enclosure. If you have a sealed enclosure, you may set it to OFF or a very low frequency.
7.3 Bass Boost
- FREQ (Bass Boost Frequency): Select the frequency at which you want the bass boost to be centered. This is typically between 30Hz and 80Hz, depending on the desired effect.
- BOOST (Bass Boost Level): Adjust the level of boost from 0dB to 12dB. Use this sparingly to avoid distortion and potential damage to your subwoofer.
7.4 Remote Bass Knob
The remote bass knob allows for convenient adjustment of the subwoofer output level from your listening position. It acts as a master volume for the subwoofer channel, allowing you to increase or decrease the bass intensity without affecting other amplitlhophiso tsa lifier.
8. Tlhokomelo
Regular maintenance helps ensure the longevity and performance of your ampmoqhobi.
- Ho hloekisa: Nako le nako hlakola ampbokantle ba lifier ka lesela le bonolo, le omileng. Qoba ho sebelisa lik'hemik'hale tse matla kapa litlhoekiso tse khorofo.
- Tlhahlobo ea Khokahano: Annually inspect all power, ground, remote, and speaker connections for corrosion or looseness. Tighten as necessary.
- Moea oa moea: Etsa bonnete ba hore ampMapheo a phodileng a lifier ha a na ditshitiso ho dumella ho qhalana ha mocheso hantle.
9. Ho rarolla mathata
Haeba u e-na le bothata le uena amplifier, refer to the following common problems and solutions.
| Bothata | Lebaka le ka khonehang | Tharollo |
|---|---|---|
| LED ha e na motlakase / motlakase e timme | Fuse e phatlohileng, terata e hlephileng ya motlakase/fatshe/e hole, ha ho na letshwao la hole. | Check inline fuse, verify all power connections, ensure head unit remote output is active. |
| Tshireletso ea LED e Butsoe | Sepikara se kgutshwane, impedance e tlase haholo, ho chesa haholo, DC offset. | Check speaker wiring for shorts, verify speaker impedance, ensure adequate ventilation, disconnect speakers and test. |
| Ha ho Audio Output | No input signal, incorrect gain setting, speaker wires disconnected. | Check RCA connections, adjust gain, verify speaker connections. |
| Molumo o sothehileng | Gain set too high, improper crossover settings, poor ground connection. | Reduce gain, adjust LPF/Subsonic filters, check ground wire for secure connection. |
10. Litlhaloso
Detailed technical specifications for the Stinger Audio MT-1000.1M ampmoqhobi.
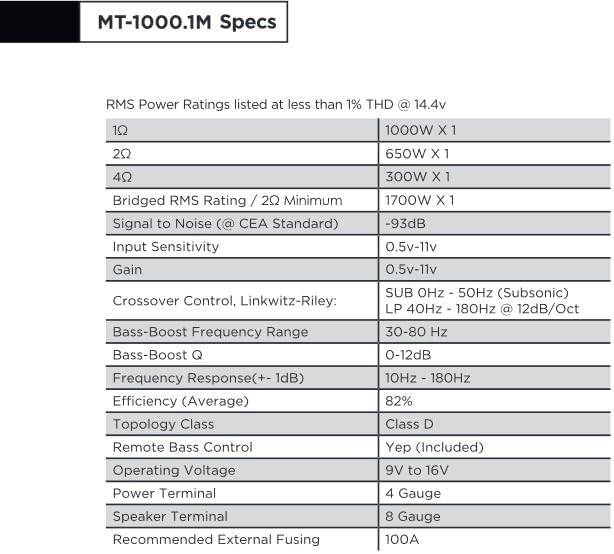
| Sebopeho | Tlhaloso |
|---|---|
| Matla a RMS (1Ω) | 1000W x 1 |
| Matla a RMS (2Ω) | 650W x 1 |
| Matla a RMS (4Ω) | 300W x 1 |
| Bridged RMS Rating (2Ω Minimum) | 1700W x 1 |
| Signal to Noise (CEA Standard) | -93dB |
| Kenyeletso ya Sensitivity | 0.5V - 11V |
| Fumana | 0.5V - 11V |
| Crossover Control (Linkwitz-Riley) | SUB 0Hz - 50Hz (Subsonic), LP 40Hz - 180Hz @ 12dB/Oct |
| Bass-Boost Frequency Range | 30Hz - 80Hz |
| Bass-Boost Q | 0 - 12dB |
| Karabelo ea Khafetsa (+/- 1dB) | 10Hz - 180Hz |
| Katleho (Karolelano) | 82% |
| Sehlopha sa Topology | Sehlopha sa D |
| Remote Bass Control | Ee (E kenyelelitsoe) |
| Tshebetso Voltage | 9V ho isa ho 16V |
| Setsi sa Matla | 4 Sehloho |
| Seteishene sa Sepikara | 8 Sehloho |
| E khothalelitsoeng Fusing ea Kantle | 100A |
| Boima ba Ntho | 6.14 liponto |
| Litekanyo tsa sephutheloana | 14.5 x 7.8 x 3.2 lisenthimithara |
| Letsatsi le Fumanang Pele | La 13 Hlakubele 2024 |
| Moetsi | hlabang |
11. Tiisetso le Tšehetso
11.1 Boitsebiso ba Tiisetso
The Stinger Audio MT-1000.1M ampLifier e tla le a Warranty ea Lilemo tse 1 from the date of purchase. Please retain your proof of purchase for warranty claims. The warranty covers manufacturing defects and workmanship under normal use. It does not cover damage caused by improper installation, accident, misuse, abuse, neglect, or unauthorized modification.
11.2 Tšehetso ea Bareki
For technical assistance, troubleshooting, or warranty inquiries, please contact Stinger Audio customer support. You can find more information and contact details by visiting the official STINGER brand store: