
Goldair GOR-900A
Goldair 2000W 9-Fin Oil Radiator User Manual
Model: GOR-900A
1. Selelekela
Thank you for choosing the Goldair 2000W 9-Fin Oil Radiator, Model GOR-900A. This instruction manual provides important information for the safe and efficient operation of your new oil radiator. Please read this manual thoroughly before use and retain it for future reference.
This portable oil radiator is designed to provide efficient and consistent warmth for indoor spaces. It features automatic thermostat control, overheat protection, and multi-directional castors for easy movement.
2. Litaelo tsa Bohlokoa tsa Tšireletso
Ha u sebelisa lisebelisoa tsa motlakase, mehato ea ts'ireletso ea mantlha e lokela ho lateloa kamehla ho fokotsa kotsi ea mollo, ts'okelo ea motlakase le likotsi ho batho.
- Read all instructions before using this radiator.
- Do not use this radiator outdoors.
- This radiator is hot when in use. To avoid burns, do not let bare skin touch hot surfaces.
- Always unplug the radiator when not in use.
- Do not operate any radiator with a damaged cord or plug, or after the radiator malfunctions or has been dropped or damaged in any manner.
- U se ke ua matha thapo tlas'a k'hapete. U se ke ua koahela thapo ka limmete tsa ho lahlela, limathi, kapa likoahelo tse tšoanang. Lokisetsa thapo hole le sebaka sa sephethephethe le moo e ke keng ea khoptjoa.
- To disconnect the radiator, turn controls to OFF, then remove plug from outlet.
- Do not insert or allow foreign objects to enter any ventilation or exhaust opening as this may cause an electric shock or fire, or damage the radiator.
- Ho thibela mollo o ka bang teng, u se ke ua thibela moea o kenang kapa oa ntša metsi ka mokhoa leha e le ofe. U se ke ua sebelisa holim'a libaka tse bonolo, joalo ka bethe, moo menyetla e ka koaloang.
- A radiator has hot and arcing or sparking parts inside. Do not use it in areas where gasoline, paint, or flammable liquids are used or stored.
- Use this radiator only as described in this manual. Any other use not recommended by the manufacturer may cause fire, electric shock, or injury to persons.
- Always plug radiators directly into a wall outlet/receptacle. Never use with an extension cord or relocatable power tap (outlet/power strip).
- Ensure the radiator is placed on a stable, level surface.
- Keep flammable materials such as furniture, pillows, bedding, papers, clothes, and curtains at least 1 meter (3 feet) from the front and sides of the radiator.
3. Likahare tsa Sephutheloana
Please check the package contents upon opening to ensure all items are present and undamaged.
- 1 x Goldair 2000W 9-Fin Oil Radiator (Model GOR-900A)
- 2 x Castor Wheel Assemblies (with mounting hardware)
- 1 x Buka ea litaelo
4. Setupo le Kopano
Before operating the radiator, follow these steps to assemble the castor wheels and prepare the unit for use.
4.1 Attaching the Castor Wheels
- Carefully turn the radiator upside down on a soft, non-abrasive surface to prevent damage to the finish.
- Locate the two U-shaped bolts and four wing nuts provided.
- Align each castor wheel assembly with the mounting holes on the bottom of the radiator, positioning them between the fins at each end.
- Insert the U-shaped bolts through the holes in the castor assembly and around the base of the radiator fins.
- Secure each U-bolt with two wing nuts, tightening them firmly but without over-tightening.
- Once both castor assemblies are securely attached, carefully turn the radiator upright.
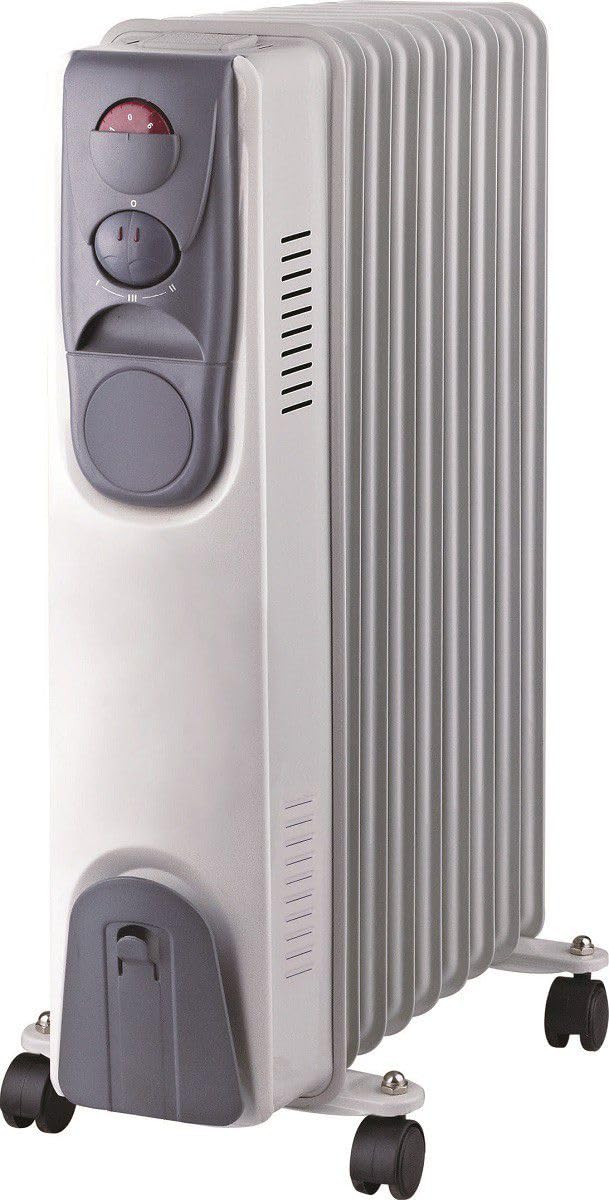
Image: The Goldair 2000W 9-Fin Oil Radiator with its castor wheels correctly installed, ready for use.
4.2 Ho bea
- Place the radiator on a firm, level surface.
- Ensure there is at least 1 meter (3 feet) of clear space around the radiator from walls, furniture, and other objects to allow for proper air circulation and prevent fire hazards.
- Do not place the radiator directly below a power outlet.
- Avoid placing the radiator in areas where it could be easily knocked over.
5. Litaelo tsa Ts'ebetso
Familiarize yourself with the controls before operating the radiator.
5.1 Ho Laola ho Fetaview
- Power switjha: E BUA kapa HO TIMA yuniti.
- Heat Setting Switches: Allows selection between two heat settings.
- Thermostat Control Daal: E fetola mocheso o lakatsehang oa kamore.
- Leseli la Sesupo: Illuminates when the heating elements are active.
5.2 Ts'ebetso ea Pele
- Ensure the radiator is placed on a stable surface and the power cord is fully uncoiled.
- Plug the power cord into a suitable 220-240V AC wall outlet.
- Turn the thermostat control dial to its maximum setting (usually marked 'MAX' or '6').
- Select a heat setting using the heat setting switches. You can choose between two settings for different heat outputs.
- The indicator light will illuminate, signifying that the heating elements are active.
- Allow the radiator to operate for a few minutes to reach its initial operating temperature.
5.3 Setting the Thermostat
Once the room reaches a comfortable temperature:
- Slowly turn the thermostat control dial counter-clockwise until the indicator light turns off.
- The radiator will now maintain this temperature by cycling on and off automatically.
- If the room temperature drops below the set level, the radiator will switch on again. If the room temperature rises, it will switch off.
5.4 Overheat Protection and Auto Safety Cut-Off
This radiator is equipped with an overheat protection system and an auto safety cut-off feature. If the radiator overheats due to restricted airflow or other reasons, the safety system will automatically switch off the unit. To reset:
- Unplug the radiator from the power outlet.
- Allow the radiator to cool down for at least 30 minutes.
- Identify and remove the cause of overheating (e.g., clear any obstructions).
- Plug the radiator back in and resume normal operation. If the issue persists, contact customer support.
6. Tlhokomelo le Poloko
6.1 Ho hloekisa
- Always unplug the radiator and allow it to cool completely before cleaning.
- Hlakola bokantle ba bokantle ka bonolo, damp lesela. Se ke oa sebelisa li-abrasive cleaners kapa solvents.
- Do not immerse the radiator in water or allow water to drip into the interior.
- Regularly remove dust from the fins and control panel using a soft brush or vacuum cleaner with a brush attachment.
6.2 Polokelo
- When not in use, store the radiator in a cool, dry place.
- If possible, store it in its original packaging to protect it from dust and damage.
- Coil the power cord neatly and secure it to prevent tangling or damage.
7. Ho rarolla mathata
If your radiator is not operating correctly, please refer to the following common issues and solutions:
| Bothata | Lebaka le ka khonehang | Tharollo |
|---|---|---|
| Radiator ha e bule. |
|
|
| Radiator e hlahisa mocheso o sa lekaneng. |
|
|
| Radiator cycles on and off too frequently. |
|
|
If the problem persists after checking these solutions, please contact Goldair customer support.
8. Litlhaloso
| Sebopeho | Lintlha |
|---|---|
| Nomoro ea Mohlala | GOR-900A |
| Brand | Goldair |
| Sehlahisoa sa Matla | 2000W |
| Palo ea Lipheletsong | 9 |
| Litlhophiso tsa Mocheso | 2 |
| Likarolo Tse Khethehileng | Portable, Automatic Thermostat Control, Overheat Protection, Auto Safety Cut-Off, Cool Touch Handles, Multi-directional Castors |
| Mokhoa oa ho futhumatsa | Convection (Oil-filled) |
| Mohloli oa Matla | Motlakase oa Corded |
| Tšebeliso ea Ka hare/Kantle | Ka hare |
| Litekanyo tsa Sehlahisoa (D x W x H) | 46D x 16W x 66H disentimitara |
| Mmala | Bosoeu |
9. Tiisetso le Tšehetso ea Bareki
Goldair products are manufactured to the highest quality standards. In the unlikely event of a defect arising from faulty materials or workmanship, your product is covered by a manufacturer's warranty.
Please retain your purchase receipt as proof of purchase. For warranty claims, technical assistance, or any questions regarding your Goldair 2000W 9-Fin Oil Radiator, please contact Goldair customer support through their official websaete kapa lintlha tsa ho ikopanya tse fanoeng le litokomane tsa theko ea hau.
Do not attempt to repair the appliance yourself, as this will void the warranty and could lead to electric shock or fire.
Ask a question about this manual
Ask about setup, troubleshooting, compatibility, parts, safety, or missing instructions. Manuals+ will review the question and use this page’s manual context to help answer it.