
Selelekela
This manual provides instructions for the installation, operation, and maintenance of the Generic Starlink Pivot Mount. This mount is designed to securely attach your Starlink Square Dish to angled upward-facing roofs or other suitable surfaces, allowing for optimal positioning and signal reception.
Boitsebiso ba Tšireletseho
Please read all safety instructions before installation and use. Failure to follow these instructions may result in injury or damage to equipment.
- Always wear appropriate personal protective equipment (PPE) during installation, including gloves and eye protection.
- Ensure the mounting surface is structurally sound and can support the weight of the mount and the Starlink dish, especially in high wind conditions.
- Exercise caution when working at heights. Use ladders or scaffolding safely and have a spotter if necessary.
- Do not overtighten screws or bolts, as this may damage the mount or the mounting surface.
- Boloka bana le liphoofolo tse ruuoang lapeng hole le sebaka sa ho kenya.
- Consult local building codes and regulations before beginning installation.
Litaba tsa Sephutheloana
Netefatsa hore likarolo tsohle li teng pele u qala ho kenya:
- Starlink Pivot Mount (1)
- Mounting Bolts/Screws (Quantity as supplied)
- Sealant (1)
- Buka ea litaelo (1)

Setšoantšo sa 1: Unboxed contents of the Starlink Pivot Mount package. This image displays the main pivot mount unit, a bag of mounting screws, a tube of sealant, and the instruction manual.
Ho seta le ho Kenya
Follow these steps to properly install your Starlink Pivot Mount and attach your Starlink Square Dish.
Lisebelisoa li Hlokahala (Ha li kenyelelitsoe):
- Qeta
- Appropriate drill bits for mounting surface
- Wrench kapa socket set
- Teipi e lekanyang
- Pensele kapa lesupa
- Boemo
Mehato ea ho Kenya:
- Khetha Sebaka sa ho Beha: Choose a location on an angled upward-facing roof or surface that provides a clear line of sight to the sky, free from obstructions like trees or buildings. Ensure the surface is strong enough to support the mount and dish.
- Position the Mount Base: Place the base of the pivot mount on the chosen surface. Use a level to ensure the base is aligned correctly, even if the surface is angled. Mark the drilling points for the mounting bolts/screws.
- Drill Pilot Holes: Using an appropriate drill bit for your mounting surface, drill pilot holes at the marked locations.
- Kenya Sealant: Apply the provided sealant around the pilot holes to prevent water intrusion, especially if mounting on a roof.
- Secure the Mount Base: Align the pivot mount base with the pilot holes and secure it using the provided mounting bolts/screws. Tighten them firmly but do not overtighten.
- Attach Starlink Dish: Insert the pole of your Starlink Square Dish into the receiver on the pivot mount. Ensure it is fully seated and secured according to Starlink's instructions for dish attachment.
- Adjust Pivot Angle: The mount allows for tilt adjustment. Loosen the adjustment knob/bolt on the side of the pivot mechanism (refer to Figure 4) to set the desired angle for your Starlink dish. This allows the dish to be positioned perpendicular to the ground for optimal signal, even if the mounting surface is angled.
- Secure Pivot Angle: Once the desired angle is achieved, tighten the adjustment knob/bolt firmly to lock the dish in position.
- Tsamaiso ea Cable: Route the Starlink cable securely, ensuring it is not pinched or exposed to damage. Use cable clips or ties as needed.

Setšoantšo sa 2: Example of the Starlink Pivot Mount installed on a vertical surface, demonstrating how the dish can be angled for optimal positioning.

Setšoantšo sa 3: The Starlink Square Dish securely attached to the pivot mount, illustrating the upward angle capability.
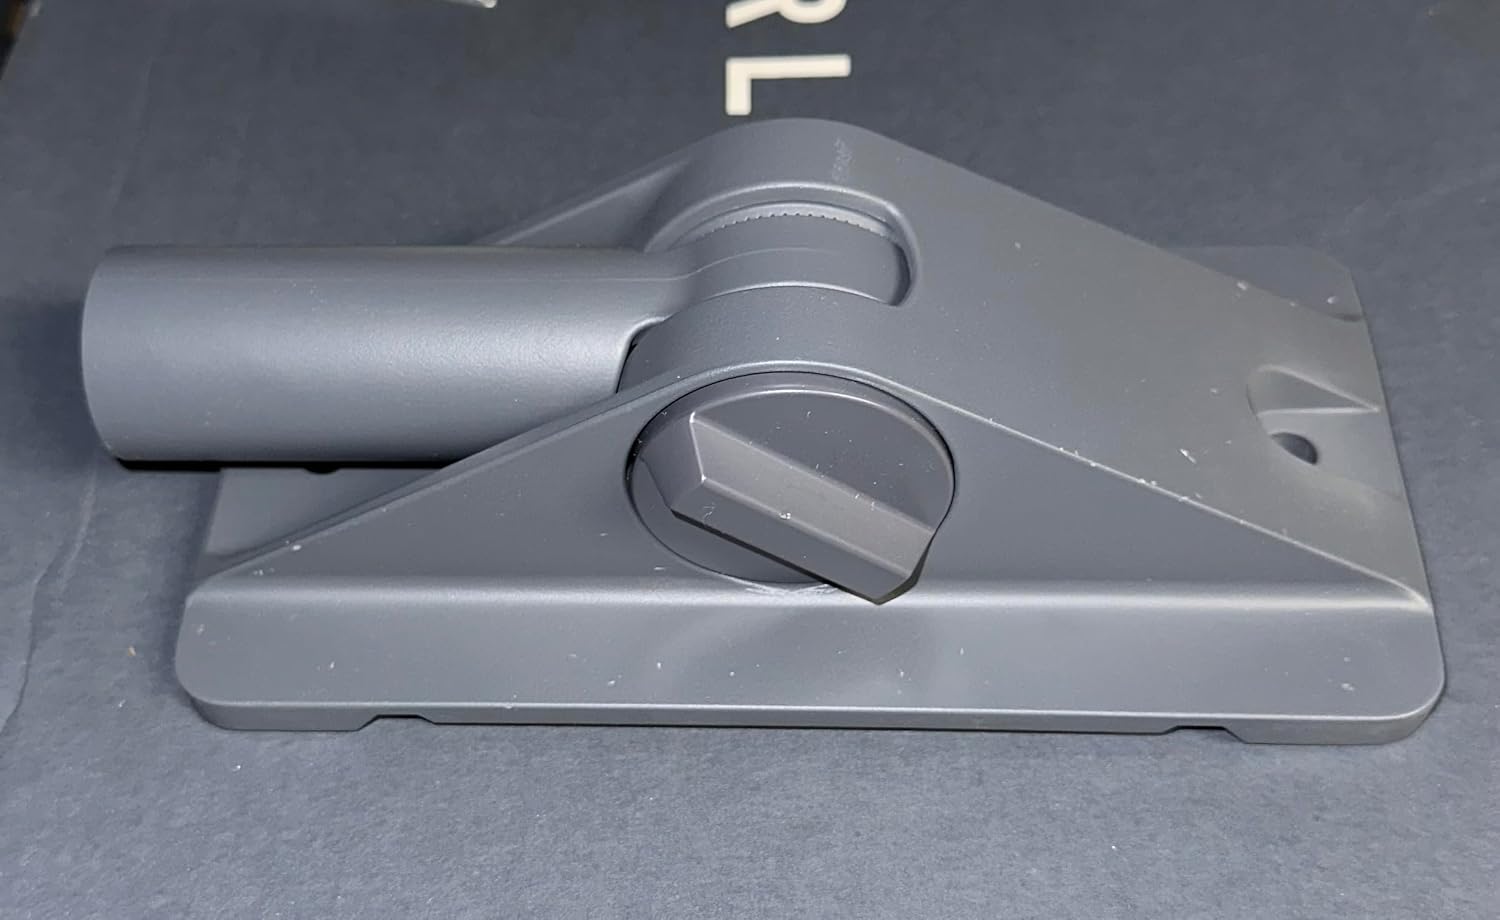
Setšoantšo sa 4: E qaqileng view of the pivot mechanism, highlighting the adjustment knob used to change the tilt angle of the Starlink dish.
Litaelo tsa Ts'ebetso
The Starlink Pivot Mount is a passive device designed to provide a stable and adjustable base for your Starlink Square Dish. Its primary function is to allow for angular adjustment of the dish to compensate for sloped mounting surfaces.
- Angle Adjustment: To adjust the angle of your Starlink dish, carefully loosen the pivot adjustment knob/bolt on the side of the mount. Gently tilt the dish to the desired position, ensuring it is perpendicular to the ground for optimal signal. Once the correct angle is achieved, firmly tighten the knob/bolt to secure the dish.
- Botsitso: Once installed and adjusted, the mount provides a fixed, stable platform. No further operational adjustments are typically required unless the dish needs repositioning or the mounting surface changes.
Tlhokomelo
Regular maintenance helps ensure the longevity and performance of your pivot mount.
- Tlhahlobo ea Nako le Nako: Annually, or after severe weather events, inspect the mount for any signs of wear, corrosion, or loosening of fasteners.
- Tiisa li-Fasteners: If any bolts or screws appear loose, carefully tighten them. Do not overtighten.
- Bohloeki: Keep the mount free from excessive dirt, debris, or ice buildup, which could impede its function or cause damage. Use a soft cloth and mild detergent if cleaning is necessary.
- Sealant Check: Inspect the sealant around the mounting points for cracks or deterioration. Reapply sealant if necessary to maintain weatherproofing.
Ho batle phoso
This section addresses common issues you might encounter with the pivot mount.
| Bothata | Lebaka le ka khonehang | Tharollo |
|---|---|---|
| Ho kenya ho ikutloa ho sa tsitsa ka mora ho kenya. | Mounting bolts are loose or surface is not strong enough. | Ensure all mounting bolts are securely tightened. Verify the structural integrity of the mounting surface. |
| Dish angle shifts after adjustment. | Pivot adjustment knob/bolt is not tightened sufficiently. | Firmly tighten the pivot adjustment knob/bolt after setting the desired angle. |
| Water leakage around mounting points. | Sealant was not applied correctly or has deteriorated. | Inspect and reapply sealant around all mounting holes to ensure a watertight seal. |
Litlhaloso
| Sebopeho | Lintlha |
|---|---|
| Nomoro ea Mohlala | 03512005-501 |
| Mofuta oa ho Beha | Pivot |
| Mofuta oa Motsamao | Sekama |
| Brand | Kakaretso |
| Lintho tse bonahalang | Tšepe |
| Mmala | Hlooho |
| Lisebelisoa tse lumellanang | Starlink Rectangular Dish |
| Maximum Tilt Angle | 60 likhato |
| UPC | 196852513123 |
| Moetsi | Starlink |
| Palo ea Lintho | 1 |
Boitsebiso ba Warranty
This product is covered by a standard manufacturer's warranty against defects in materials and workmanship. Please refer to the product packaging or contact the retailer for specific warranty terms and conditions. Keep your proof of purchase for warranty claims.
Tšehetso
For technical assistance, troubleshooting beyond this manual, or inquiries regarding your Starlink Pivot Mount, please contact your retailer or the manufacturer's customer support. Please have your model number (03512005-501) and proof of purchase ready when contacting support.