
1. Selelekela
This manual provides essential instructions for the setup, operation, maintenance, and troubleshooting of your Shuttle XPC Slim DH610 Barebone PC. The DH610 is a compact and versatile barebone system designed to support Intel 12th and 13th Generation LGA1700 processors, offering robust performance for various applications including office, digital signage, and kiosks.
2. Boitsebiso ba Tšireletseho
Ka kopo bala le ho latela litataiso tsena tsa polokeho ho thibela tšenyo sesebelisoa kapa kotsi ho uena:
- Always disconnect the power cord before performing any installation or maintenance.
- Ensure the system is placed on a stable, flat surface with adequate ventilation.
- U se ke ua beha sesebelisoa sebakeng se mongobo, mochesong o feteletseng, kapa letsatsing le tobileng.
- Only use the power adapter provided or an approved equivalent.
- Refer to qualified service personnel for any repairs not covered in this manual.
3. Likahare tsa Sephutheloana
Netefatsa hore lintho tsohle li teng ka har'a sephutheloana sa hau:
- Shuttle XPC Slim DH610 Barebone PC Unit
- VESA Mount Kit
- Adapter ea Matla le Cord
- Accessory Pack (screws, cables, etc.)
- Tataiso ea ho Qala ka Potlako (haeba e kenyelelitsoe)
4. Ho seta le ho kenya
The Shuttle DH610 is a barebone system, requiring the installation of a CPU, RAM, and storage devices before operation.
4.1. Opening the Chassis
Carefully remove the chassis cover to access the internal components. Typically, this involves unscrewing a few screws on the rear or sides of the unit and sliding the cover off.

Image: The Shuttle XPC Slim DH610 with its top cover removed, showing the internal layout including cooling fans and the motherboard.
4.2. Ho kenya CPU
The DH610 supports Intel 12th/13th Generation Alder Lake-S LGA1700 processors with a maximum TDP of 65W. Ensure your chosen CPU has integrated graphics, as the system does not support F-series processors without integrated graphics or K-series processors.
- Bula lever ea sokete ea CPU 'me u tlose sekoahelo se sireletsang.
- Carefully align the CPU with the socket, matching the triangular markers.
- Kenya CPU ka bonolo ka har'a sokete ntle le ho e qobella.
- Kwala lever ea sokete ho tiisa CPU.
- Kenya cooler ea CPU ho latela litaelo tsa moetsi oa eona.
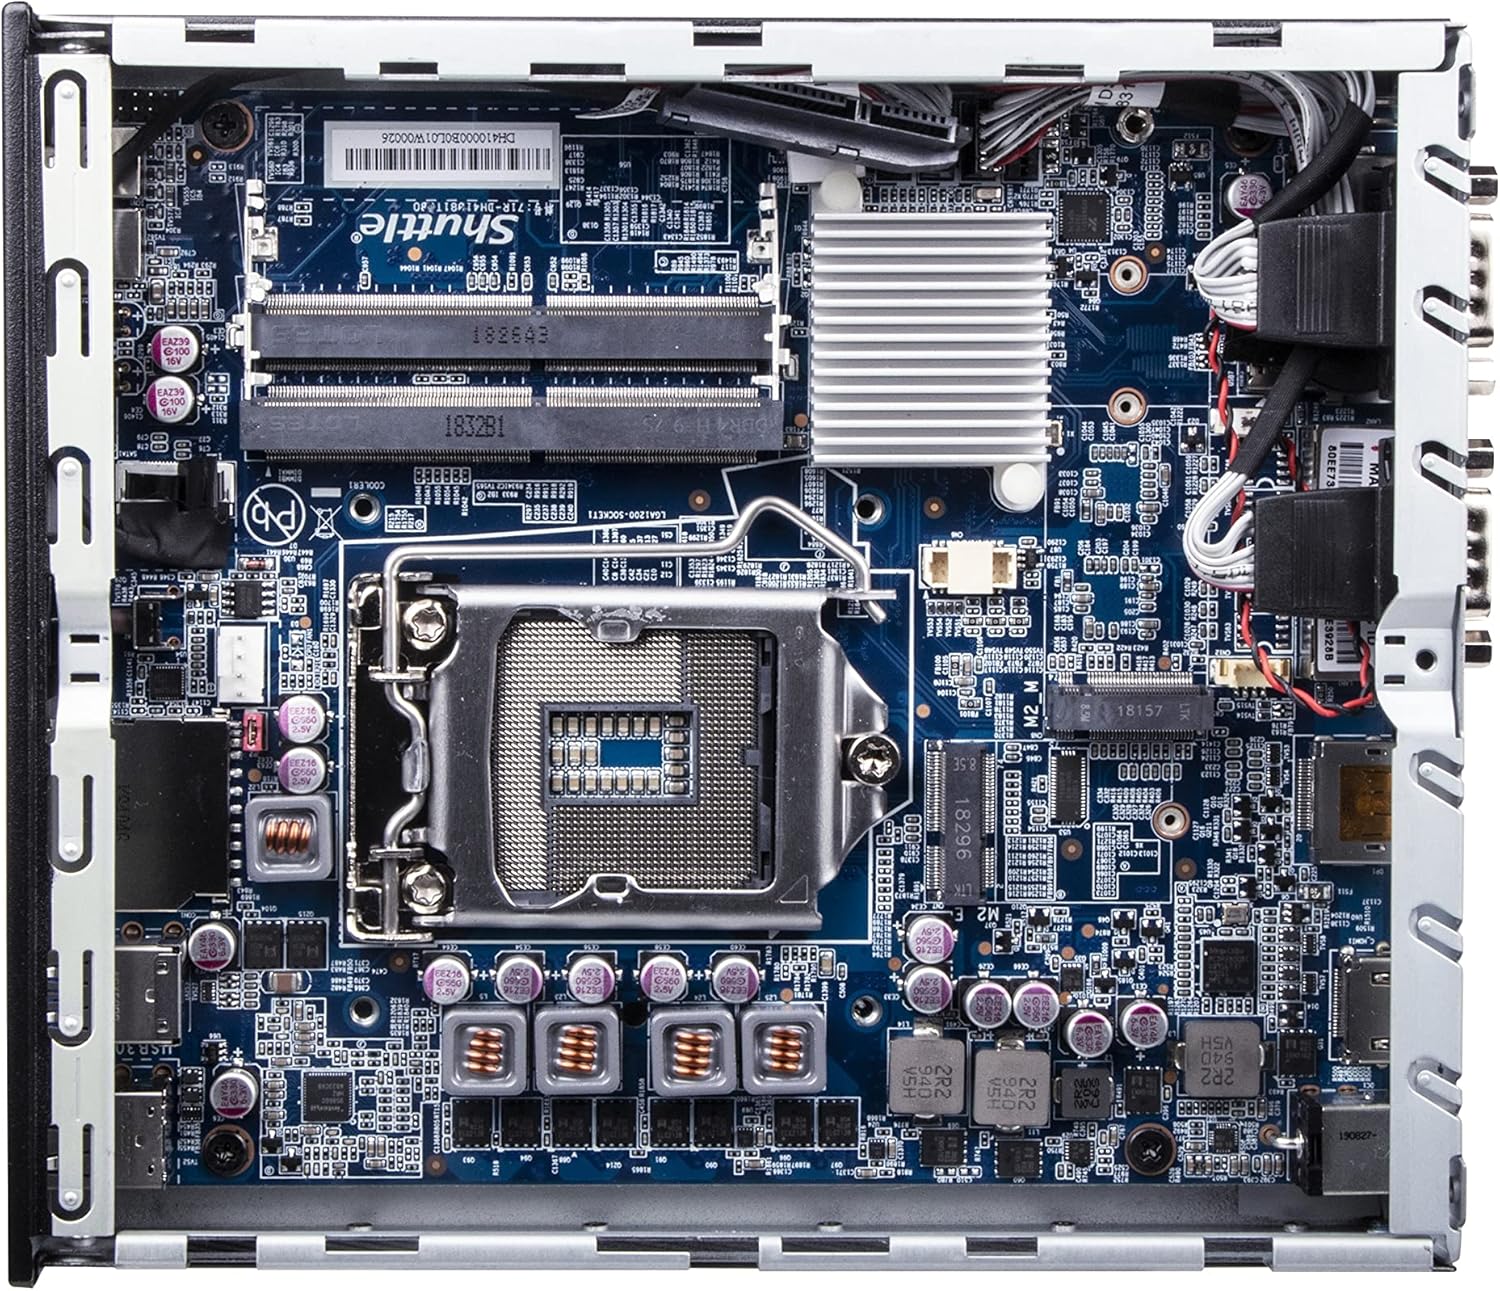
Setšoantšo: E qaqileng view of the Shuttle DH610 motherboard, highlighting the LGA1700 CPU socket, RAM slots, and other integrated circuits.
Note: For 13th Gen Intel Processors, BIOS Version DH610000.202 or newer is required. Update BIOS if necessary after initial setup with a 12th Gen CPU or via a compatible method.
4.3. Ho kenya RAM
The system features two 260-pin dual-channel DDR4 SODIMM slots, supporting up to 64GB (2x 32GB) at 3200MHz. Dual-channel memory is recommended for optimal performance.
- Locate the SODIMM slots on the motherboard.
- Lokisetsa notch mojuleng oa RAM le senotlolo se sekoting.
- Insert the module at a 45-degree angle and push down until the clips on both sides snap into place.
4.4. Ho kenya polokelo
The DH610 supports one 2.5-inch HDD/SSD and one M.2 2280 SSD.
- 2.5" Drive: Mount the 2.5" HDD/SSD into the designated bay using the provided screws and connect the SATA data and power cables.
- M.2 SSD: Insert the M.2 2280 SSD into its slot, securing it with the provided screw.
4.5. Ho hokahanya Peripherals
After installing internal components, reattach the chassis cover. Connect your peripherals to the available ports:
- Hlahisa: Connect your monitor(s) to the HDMI 2.0b port or one of the two DisplayPort outputs. The system supports up to three 4K UHD displays.
- Lisebelisoa tsa USB: Use the four USB 3.2 Gen1 ports (including one Type-C) and four USB 2.0 ports for keyboard, mouse, and other USB devices.
- Marang-rang: Connect to your network using either of the two Gigabit Ethernet LAN ports (Intel 2.5GbE + Intel 1GbE).
- Lisebelisoa: Utilize the two RS232 COM ports for compatible devices.
- Molumo: Connect headphones or a microphone to the front audio jacks.

Image: The front panel of the Shuttle DH610, featuring the power button, USB 3.2 Gen1 ports (one Type-C), and audio input/output jacks.

Image: The rear panel of the Shuttle DH610, displaying the DC-IN power input, HDMI, two DisplayPort outputs, two LAN ports, USB ports, and two COM ports.
4.6. Khokelo ea Matla
Connect the power adapter to the DC-IN port on the rear of the unit, then plug the power cord into an electrical outlet.
5. Litaelo tsa Ts'ebetso
5.1. Ho tima/Ho tima
- Matlafatsa: Tobetsa konopo ea matla e sebakeng se ka pele.
- Tlosa motlakase: Perform a graceful shutdown through your operating system. Alternatively, press and hold the power button for 4-5 seconds for a forced shutdown (use only when necessary).
5.2. Ts'ebetso ea Ts'ebetso ea Ts'ebetso
The DH610 is compatible with Windows 11/10 (64-bit) and Linux (64-bit) operating systems. Follow the standard installation procedures for your chosen OS. Ensure all necessary drivers are installed for optimal performance, which can typically be found on the Shuttle support websebaka.
5.3. Phihlello ea BIOS/UEFI
Ho fihlella sesebelisoa sa ho seta sa BIOS/UEFI, tobetsa konopo Hlakola or F2 key repeatedly during system startup. This allows configuration of boot options, system settings, and hardware parameters.
6. Tlhokomelo
6.1. Ho hloekisa
Regularly clean the exterior of the unit with a soft, dry cloth. Use compressed air to clear dust from ventilation openings to ensure proper airflow and prevent overheating. Do not use liquid cleaners directly on the device.
6.2. Lintlafatso tsa BIOS
Periodically check the Shuttle website for BIOS updates. BIOS updates can improve system stability, add support for new hardware (like 13th Gen Intel CPUs), and fix bugs. Follow the instructions provided with the BIOS update package carefully.
7. Ho rarolla mathata
If you encounter issues with your DH610, refer to the following common problems and solutions:
- Ha ho Pontsho:
- Ensure the monitor is powered on and correctly connected to the HDMI or DisplayPort.
- Verify that the CPU has integrated graphics and that the display cable is connected to the motherboard's video output, not a discrete graphics card (if applicable).
- Leka thapo e 'ngoe ea ponts'o kapa monitor.
- Sisteme ha e sebetse:
- Check that the power adapter is securely connected to both the unit and the electrical outlet.
- Ensure the CPU and RAM are correctly installed and seated.
- Lekola phallo ea motlakase ka sesebelisoa se seng.
- 13th Gen CPU Not Recognized:
- The system requires BIOS Version DH610000.202 or newer for 13th Gen Intel processors. If you have an older BIOS, you may need to install a 12th Gen CPU first to update the BIOS.
- Sistimi e Fetang mocheso:
- Ensure the chassis ventilation holes are not obstructed.
- Clean any dust accumulation from the internal fans and heatsinks.
- Verify the CPU cooler is properly installed and making good contact with the CPU.
8. Litlhaloso
| Sebopeho | Tlhaloso |
|---|---|
| Brand | Shuttle |
| Lebitso la Mohlala | DH610 |
| CPU Socket | LGA 1700 |
| Li-processor tse tšehelitsoeng | Intel 12th/13th Gen Alder Lake-S (65W max, with integrated graphics) |
| Chipset | Intel H610 |
| Mofuta oa RAM | DDR4 SODIMM (2x slots) |
| Bokhoni bo phahameng ba RAM | 64 GB (2x 32GB) |
| Lebelo la memori | Ho fihla ho 3200 MHz |
| Litšoantšo | Integrated Intel UHD Graphics (CPU dependent) |
| Sephetho sa Video | 1x HDMI 2.0b, 2x DisplayPort (Supports triple 4K UHD displays) |
| Polokelo | 1x 2.5" HDD/SSD bay, 1x M.2 2280 slot |
| Li-port tsa USB | 4x USB 3.2 Gen1 (1x Type-C), 4x USB 2.0 (Total 8) |
| LAN | 1x Intel 2.5GbE, 1x Intel 1GbE |
| Li-ports tsa serial | 2x RS232 (COM) |
| Tšebelisano ea Tsamaiso ea Ts'ebetso | Windows 11/10 (64-bit), Linux (64-bit) |
| Tšebeliso ea Matla | 65 Watts (CPU) |
| Kenyellelitsoe Likaroloana | Thaba ea VESA |
9. Tiisetso le Tšehetso
9.1. Tiisetso ea Moetsi
The Shuttle XPC Slim DH610 Barebone PC comes with a 3-Year Manufacturer's Warranty. This warranty covers defects in materials and workmanship under normal use. Please retain your proof of purchase for warranty claims.
9.2. Tšehetso ea Theknoloji
For technical assistance, driver downloads, BIOS updates, or further troubleshooting not covered in this manual, please visit the official Shuttle website or contact Shuttle customer support. Free lifetime technical support is typically provided by the manufacturer.
Ho fumana lintlha tse ling, etela: www.shuttle.com