
1. Selelekela
This manual provides essential information for the safe and efficient operation of your TechniSat DIGITRADIO 370 IR. Please read these instructions carefully before using the device and retain them for future reference.
2. Litaelo tsa Tšireletso
- Se ke oa beha sesebelisoa puleng kapa mongobo ho thibela mollo kapa ts'okelo ea motlakase.
- Do not block ventilation openings. Ensure adequate space around the device for proper airflow.
- Sebelisa feela adaptara ea motlakase e fanoeng le sesebelisoa.
- Qoba ho beha sesebediswa haufi le mehlodi ya mocheso e kang di-radiator, di-heat registers, di-stove, kapa sesebediswa se seng (ho kenyeletswa amplifiers) tse hlahisang mocheso.
- Sireletsa thapo ea motlakase hore e se ke ea tsamauoa kapa e penngoa, haholo-holo ha li-plug, litšepe tse bonolo, le moo li tsoang teng.
- Tlosa sesebelisoa sena nakong ea sefefo sa lehalima kapa ha se sa sebelisoe ka nako e telele.
- Fetisetsa lits'ebeletso tsohle ho basebetsi ba tšoanelehang. Ts'ebeletso e hlokahala ha lisebelisoa li senyehile ka tsela efe kapa efe, joalo ka thapo ea phepelo ea motlakase kapa plug e senyehile, mokelikeli o tšolohile kapa lintho li oele ka har'a lisebelisoa, sesebelisoa se pepesehetse pula kapa mongobo, ha se sebetse ka mokhoa o tloaelehileng. , kapa e lahliloe.
3. Likahare tsa Sephutheloana
Netefatsa hore lintho tsohle li teng ka har'a sephutheloana:
- TechniSat DIGITRADIO 370 IR (Black)
- Remote Control
- Adapter ea Matla
- Bukana ea mosebelisi (tokomane ena)
4. Taolo le Khokelo

Setšoantšo sa 4.1: Phanele e ka Peleview
The image above displays the front panel of the DIGITRADIO 370 IR, featuring the central display, volume and tuning/OK rotary knobs, and various control buttons such as Power, Mode, Preset, Scan, and Back.
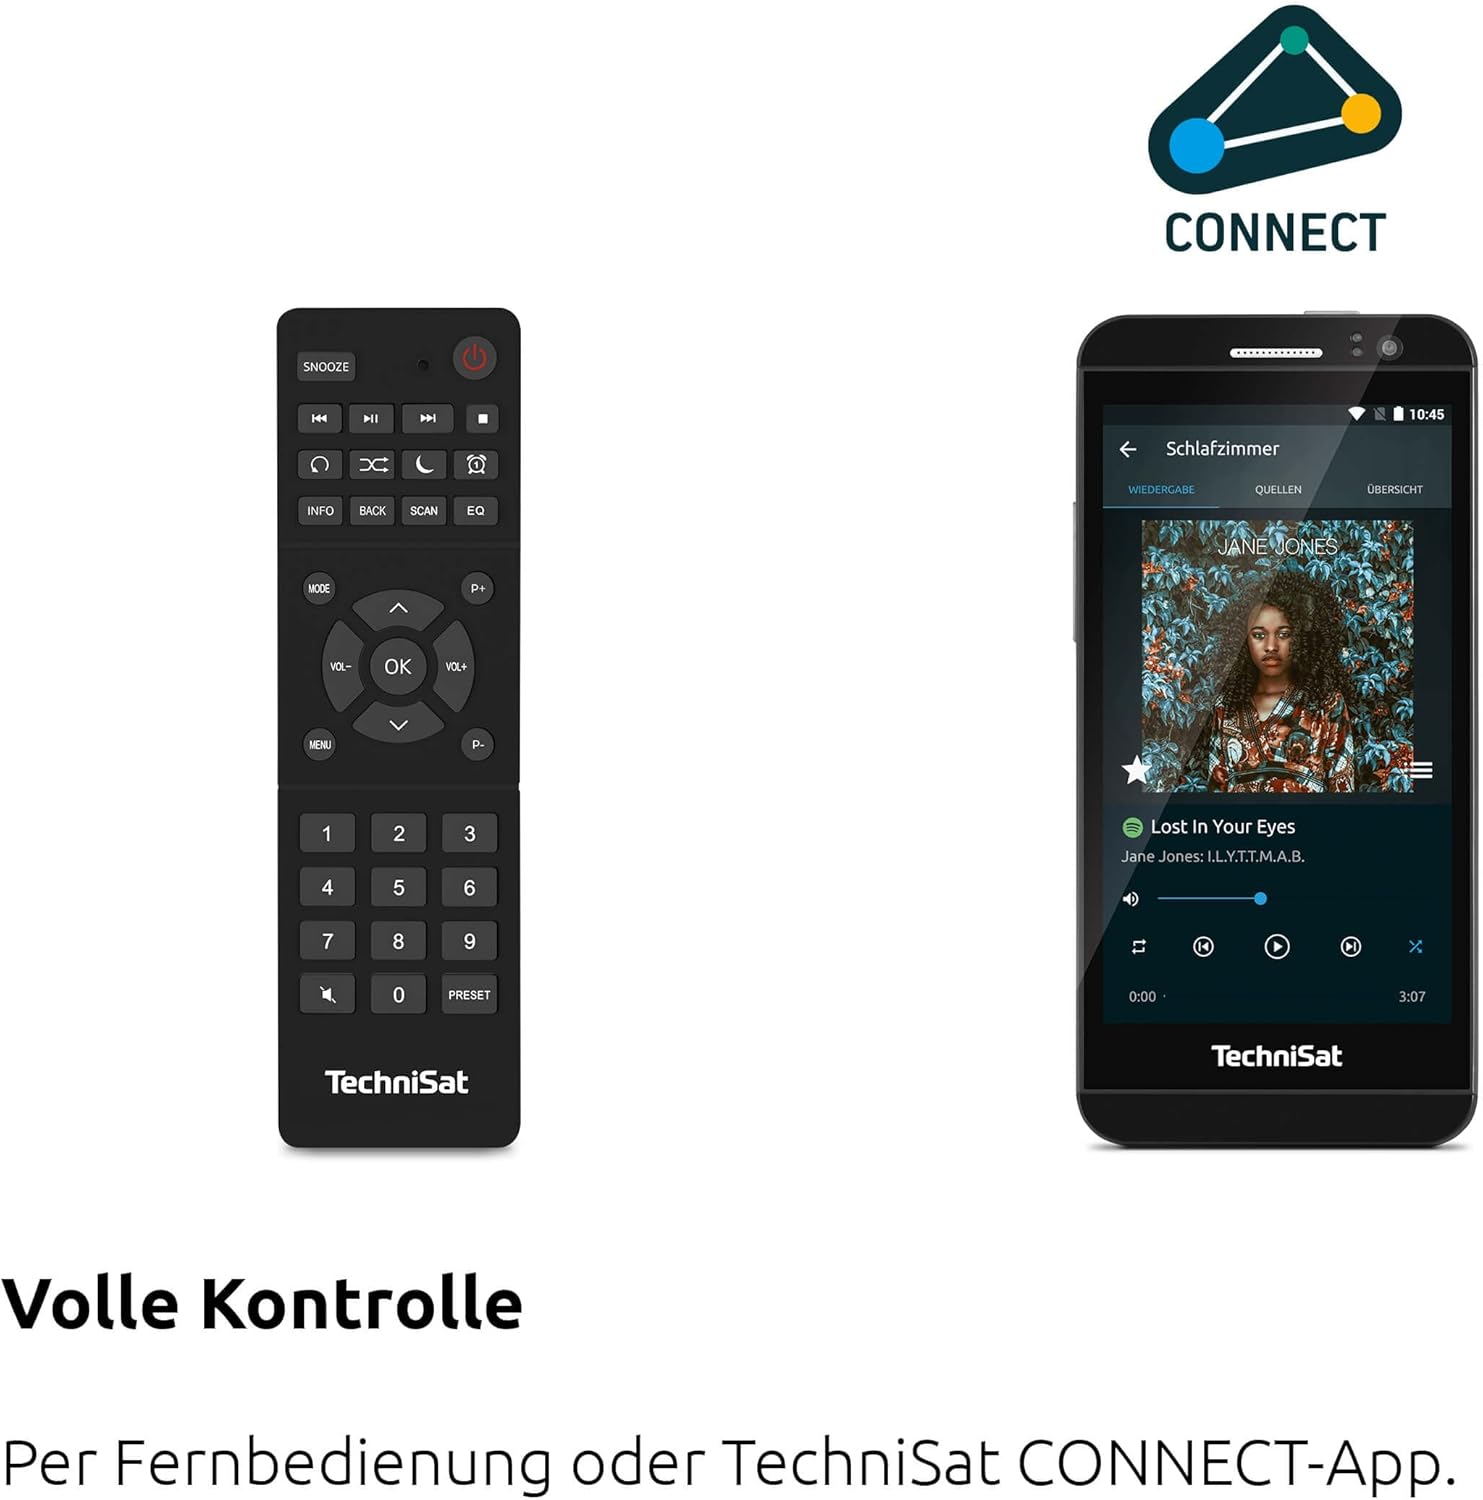
Figure 4.2: Remote Control and App Interface
This image shows the included remote control with buttons for power, snooze, mode, info, scan, EQ, preset numbers, volume, and navigation. It also illustrates the TechniSat CONNECT app interface on a smartphone, providing an alternative control method.
Front Panel Controls:
- Konopo ea Matla: E bulela/ tima sesebelisoa.
- Konopo ea Mokhoa: Switches between DAB+, FM, Internet Radio, Bluetooth, AUX, and USB modes.
- Konopo ea Preset: Accesses stored radio station presets.
- Kotola ea Buka: E fetola boemo ba tlhahiso ea molumo.
- Tuning/OK Knob: E tsamaisa ka har'a limmapa ebe e netefatsa likhetho.
- Konopo ea ho Skena: Initiates station scanning in radio modes.
- Konopo ea ho Khutlela: E khutlela ho lenane kapa skrineng e fetileng.
- Hlahisa: 2.4-inch TFT color display for information and menu navigation.
Lihokelo tsa Panel tse ka morao:
- Kenyeletso ea Matla: Kopanya adaptara ea motlakase eo u e fuoeng.
- AUX-IN: 3.5mm jack bakeng sa ho hokahanya lisebelisoa tsa audio tsa kantle.
- Li-headphone Jack: Sekoahelo sa 3.5mm bakeng sa ho mamela ka boinotšing.
- Boema-kepe ba USB: For MP3 playback from USB drives and charging external devices.
5. Seta
5.1 Matlafatso ea Pele
- Place the DIGITRADIO 370 IR on a stable, flat surface.
- Extend the telescopic antenna for optimal DAB+ and FM reception.
- Connect the power adapter to the DC IN port on the rear of the radio and then to a wall outlet.
- Press the Power button on the front panel or remote control to turn on the device.
- Follow the on-screen prompts for initial setup, including language selection and network configuration.
5.2 Network Configuration (WLAN)
To access Internet Radio and app control, the device must be connected to a Wi-Fi network.
- Navigate to the 'Settings' menu using the Tuning/OK knob.
- Select 'Network' and then 'Wi-Fi Setup'.
- The radio will scan for available networks. Select your desired network from the list.
- Enter the Wi-Fi password using the on-screen keyboard and the Tuning/OK knob.
- Confirm the connection. Once connected, the Wi-Fi icon will appear on the display.
6. Litaelo tsa Ts'ebetso

Figure 6.1: Radio Diversity
This image highlights the multiple radio reception options available: DAB+ Digital Radio, Internet Radio via WLAN, and UKW/FM analog radio.
6.1 DAB+ Radio
- Press the 'Mode' button until 'DAB+' is selected.
- The radio will automatically scan for available DAB+ stations during the first use. To initiate a scan manually, press the 'Scan' button.
- Use the Tuning/OK knob to scroll through the list of available stations. Press the knob to select a station.
- To save a station as a preset, press and hold the 'Preset' button, then select a preset number and confirm.
6.2 FM Radio
- Press the 'Mode' button until 'FM' is selected.
- Press the 'Scan' button to automatically search for and store FM stations.
- Alternatively, use the Tuning/OK knob to manually tune to a frequency.
- To save a station as a preset, press and hold the 'Preset' button, then select a preset number and confirm.
6.3 Radio ea Marang-rang
Ensure the radio is connected to a Wi-Fi network (see Section 5.2).
- Press the 'Mode' button until 'Internet Radio' is selected.
- O ka sheba liteishene ka sebaka, mofuta, kapa wa batla liteishene tse itseng.
- Use the Tuning/OK knob to navigate and select stations.
- To save a station as a preset, press and hold the 'Preset' button, then select a preset number and confirm.
6.4 Ho Phallela ha Molumo oa Bluetooth

Figure 6.2: Bluetooth Audio Streaming
This image demonstrates a smartphone wirelessly streaming music to the radio via Bluetooth, indicating the device's capability for wireless music enjoyment.
- Press the 'Mode' button until 'Bluetooth' is selected. The radio will enter pairing mode.
- On your smartphone or other Bluetooth device, enable Bluetooth and search for available devices.
- Select 'DIGITRADIO 370 IR' from the list to pair.
- Hang ha di kopantswe, o ka bapala modumo ho tswa sesebedisweng sa hao ka radio.
6.5 Ho Bapala le ho Tjhaja USB

Figure 6.3: USB Playback and Charging Function
This image illustrates the dual functionality of the USB port: connecting USB storage devices for MP3 playback and using the port to charge compatible devices like smartphones.
- Kenya USB flash drive e nang le MP3 filee kene koung ea USB ka morao ho seea-le-moea.
- Press the 'Mode' button until 'USB' is selected.
- Use the Tuning/OK knob to navigate through folders and select tracks for playback.
- The USB port can also be used to charge compatible smartphones and other devices. Connect your device's charging cable to the USB port.
6.6 Ho tjhaja ka Waelese

Figure 6.4: Wireless Charging Function
This image shows a hand placing a smartphone on the top surface of the radio, demonstrating the wireless charging capability for compatible smartphones.
The DIGITRADIO 370 IR features a wireless charging surface on its top panel.
- Ensure your smartphone or device supports Qi wireless charging.
- Place your compatible device centrally on the designated wireless charging area on top of the radio.
- The device should indicate that charging has begun.
6.7 Oache ea Alamo, Nako ea ho Robala, le ho Khutsa
The radio includes an alarm clock, sleep timer, and snooze function.
- Alamo Clock: Set up to two independent alarms with customizable sources (buzzer, DAB+, FM, Internet Radio) and volume. Access via the 'Settings' menu.
- Nako ea Boroko: Allows the radio to turn off automatically after a set period (e.g., 15, 30, 60 minutes). Access via the 'Settings' menu.
- Robatsa: When an alarm sounds, press the 'Snooze' button on the remote control to temporarily pause the alarm.
6.8 App Control (UNDOK App)
The DIGITRADIO 370 IR can be controlled via the UNDOK app on your smartphone or tablet.
- Download the 'UNDOK' app from your device's app store.
- Ensure your smartphone/tablet and the radio are connected to the same Wi-Fi network.
- Open the UNDOK app; it should automatically detect your DIGITRADIO 370 IR.
- You can now control all major functions of the radio, including mode selection, station tuning, volume, and presets, directly from the app.
7. Tlhokomelo
7.1 Ho hloekisa
- Kamehla hula sesebelisoa ho tsoa mohloling oa motlakase pele o hloekisa.
- Sebelisa lesela le bonolo, le omeletseng ho hlakola bokantle ba kantle.
- Do not use liquid cleaners, aerosol cleaners, or strong chemical solvents, as these may damage the finish.
7.2 Polokelo
If storing the device for an extended period, unplug it from the power source and store it in a cool, dry place, away from direct sunlight and extreme temperatures.
8. Ho rarolla mathata
| Bothata | Lebaka le ka khonehang | Tharollo |
|---|---|---|
| Ha ho matla | Thapo ea motlakase ha e hokahane; Sehokelo sa motlakase se na le phoso | Check power cable connection; Try a different power outlet. |
| Ha ho molumo | Volume too low; Mute activated; Incorrect source selected | Increase volume; Check if mute is active; Select the correct input source (DAB+, FM, Internet, Bluetooth, USB, AUX). |
| Kamohelo e mpe ea seea-le-moea (DAB+/FM) | Antenna not extended; Weak signal; Interference | Fully extend the telescopic antenna; Reposition the radio; Avoid placing near other electronic devices. |
| Internet Radio not working | No Wi-Fi connection; Incorrect Wi-Fi password; Router issue | Check Wi-Fi connection in settings; Re-enter Wi-Fi password; Restart your Wi-Fi router. |
| Ho hokahanya ha Bluetooth ho hlolehile | Radio not in pairing mode; Device too far; Bluetooth off on source device | Ensure radio is in Bluetooth mode; Move devices closer; Enable Bluetooth on your source device. |
| Ho tjhaja ka waelese ha ho sebetse | Device not Qi-compatible; Device not placed correctly; Phone case too thick | Verify device supports Qi charging; Adjust device position on charging pad; Remove thick phone cases. |
9. Litlhaloso
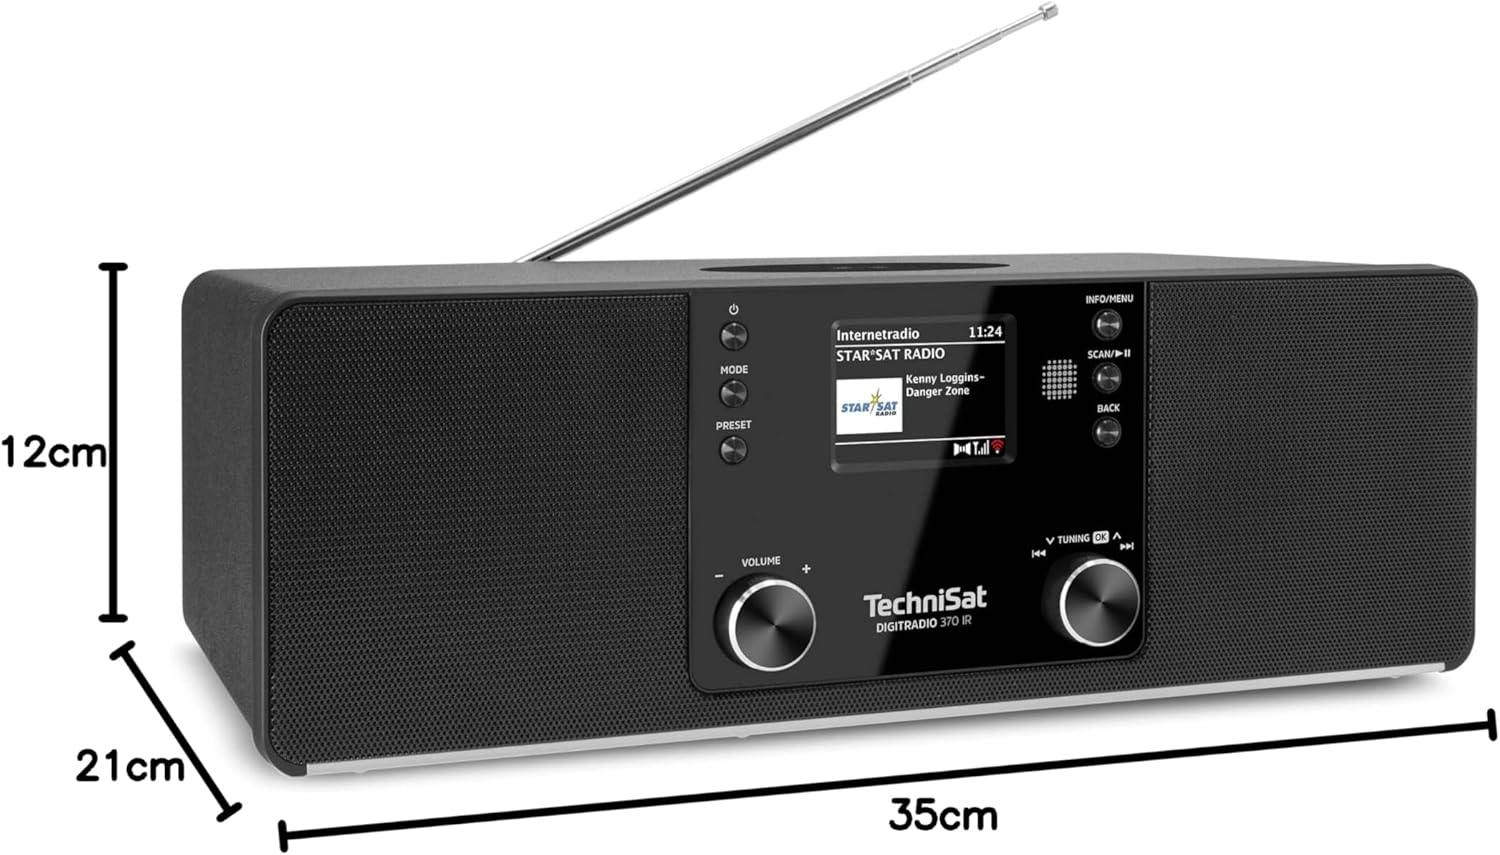
Setšoantšo sa 9.1: Litekanyo tsa Lihlahisoa
This image provides a visual representation of the radio's dimensions: 35 cm (length), 12 cm (height), and 21 cm (depth).
| Sebopeho | Lintlha |
|---|---|
| Nomoro ea Mohlala | 0000/3971 |
| Brand | TechniSat |
| Lihlopha tsa seea-le-moea tse tšehelitsoeng | DAB+, FM, Seea-le-moea sa Inthanete |
| Theknoloji ea Khokahano | Bluetooth, USB, Wireless-Charging, WLAN (2.4 GHz & 5 GHz) |
| Likarolo Tse Khethehileng | Wireless Charging, Bluetooth Audio Streaming, USB Playback & Charging, Alarm Clock, Sleep Timer, Snooze, App Control (UNDOK) |
| Mokhoa oa Phatlalatso ea Audio | Setereo |
| Matla a Phano ea Sebui | 2 x 5 Watts RMS (10 Watts total) |
| Mofuta oa Pontšo | 2.4-inch TFT Color LCD |
| Mohloli oa Matla | Electric Cord (230 Volts, 60 Hz) |
| Litekanyo (L x W x H) | 35 x 21 x 12 cm, |
| Boima ba 'mele | 2.7 lik'hilograma |
| Thepa ea Matlo | Lehong |
| Lisebelisoa tse lumellanang | Smartphone, MP3 player, tablet, laptop, headphones |
| Li-interface | 3.5 mm Audio (AUX-IN), USB 2.0, 3.5 mm Headphone |
10. Tiisetso le Tšehetso
10.1 Boitsebiso ba Tiisetso
This product comes with a 2-year warranty (Gewährleistung) from the date of purchase. Please retain your proof of purchase for any warranty claims. The warranty covers manufacturing defects and malfunctions under normal use. It does not cover damage caused by misuse, accidents, unauthorized modifications, or normal wear and tear.
10.2 Tšehetso ea Bareki
For technical assistance, troubleshooting beyond this manual, or warranty inquiries, please contact TechniSat customer support. Refer to the TechniSat official website bakeng sa lintlha tsa ho ikopanya le sebaka sa heno.
Lisebelisoa tsa Marang-rang: Visit the official TechniSat website for updated manuals, FAQs, and support information.