
1. Sehlahisoa Overview
The Integra DTM-7 is a Network A/V Stereo Receiver designed to integrate modern digital audio and video technologies with traditional stereo sound. It supports advanced HDMI switching for 4K and HDR10 content, offers robust network connectivity for streaming services, and includes wireless audio capabilities. The receiver is built with a focus on sound quality and versatile control options.
Setšoantšo sa 1.1: Pele view of the Integra DTM-7 Network A/V Stereo Receiver. This image displays the front panel controls, display, and input jacks.
Likarolo tsa Bohlokoa:
- Motlakase o Phahameng: Delivers 100 Watts per channel (8 Ohms, 20 Hz-20 kHz, 0.08% THD, 2 Channels Driven, FTC) with 4-ohm stability, housed in an anti-resonant steel chassis and audiophile-grade aluminum front panel.
- Advanced HDMI Connectivity: Features 4 HDMI inputs and 1 HDMI output, supporting 4K/60 Hz, HDR10, HLG (Hybrid Log-Gamma), Dolby Vision, and BT.2020 Pass-thru with HDCP 2.2, 4:4:4 Color Space, and WCG (Wide Color Gamut).
- Sonos Integration: Compatible with existing Sonos Home Sound Systems or as a starting point for a new one, allowing for music streaming capability with Sonos Connect and a firmware update.
- Extensive Network and Wireless Audio: Includes Wi-Fi and Bluetooth compatibility, providing access to internet radio sources such as Tidal, Pandora, Spotify, Deezer, and TuneIn. Supports Chromecast Built-In, DTS Play-Fi technology, and AirPlay for wireless audio streaming.
- Analog Connectivity: Features a built-in phono preamp for turntable connection.
- Dikgetho tsa Taolo e Tenyetsehang: Controllable via the included IR remote, the Integra Control Pro app (for iOS and Android devices), or through 3rd party control systems utilizing IP or RS232C.
2. Se ka Lebokoseng
Netefatsa hore lintho tsohle tse thathamisitsoeng ka tlase li kenyelelitsoe ka har'a sephutheloana:
- Integra DTM-7 Network A/V Stereo Receiver
- Thapo ea matla
- Lenaneo la ka hare la FM
- AM loop antenna
- Seta maekrofounu
- Basic manual (this document provides detailed instructions)
- Remote Control
- 2 AAA Batteries (bakeng sa taolo e hole)
3. Seta
3.1 Ho Hokela Likarolo tsa Hao
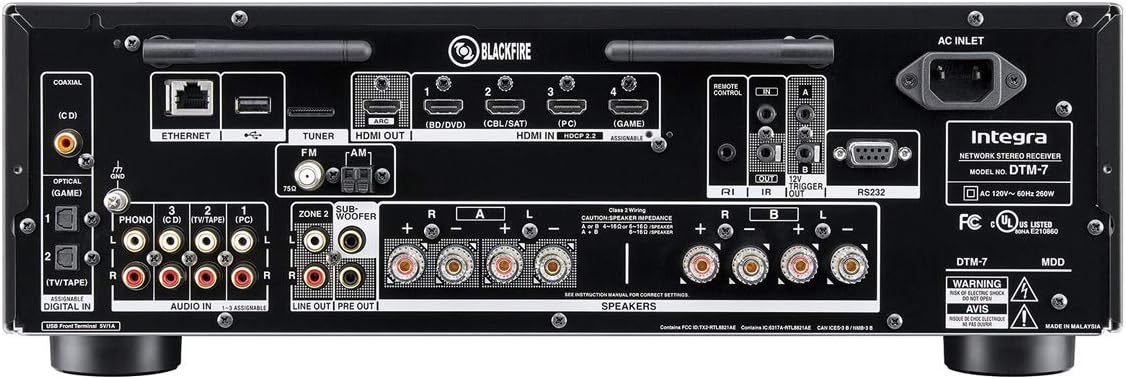
Before making any connections, ensure the receiver and all components are powered off and unplugged from the wall outlet. Refer to the rear panel diagram for connection points.

Setšoantšo sa 3.1: Rear panel connections of the Integra DTM-7. This image illustrates the various input and output ports for audio, video, and network connections.
- Lihokelo tsa Sebui: Connect your passive speakers to the SPEAKER terminals on the rear panel. Ensure correct polarity (+ to + and - to -) for each speaker. The DTM-7 supports 4-ohm compatible speakers. For optimal performance, use high-quality speaker cables.
- Lihokelo tsa HDMI: Connect your video sources (e.g., Blu-ray player, game console, streaming device) to the HDMI IN ports. Connect your TV or projector to the HDMI OUT port. The HDMI ports support 4K/60 Hz, HDR10, Dolby Vision, and HDCP 2.2.
- Khokahano ea Marangrang: For wired network access, connect an Ethernet cable from your router to the ETHERNET port. For wireless network access, ensure the Wi-Fi antennas are properly attached and positioned.
- Lihokelo tsa molumo oa Analog: Connect analog audio sources (e.g., CD player, cassette deck) to the AUDIO IN ports. For turntables, connect to the PHONO input, which includes a built-in preampmoqhobi.
- Lihokelo tsa Antenna: Connect the supplied FM and AM antennas to their respective terminals for radio reception.
- Khokelo ea Matla: After all other connections are made, connect the power cord to the AC INLET on the receiver and then to a wall outlet.
3.2 Tlhophiso ea Pele le Tokiso
After connecting your components, perform the initial setup:
- Matlafatsa: Tobetsa ea TSAMAYA / EMETSE button on the front panel or remote control to power on the receiver.
- On-Screen Setup Guide: Follow the on-screen instructions displayed on your TV for initial configuration, including language selection and network settings.
- Tekanyo ea Sebui: Use the supplied speaker setup microphone. Connect it to the dedicated port on the front panel. Place the microphone at your primary listening position and follow the on-screen prompts to automatically calibrate your speakers for optimal sound.
4. Litaelo tsa Ts'ebetso
4.1 Ts'ebetso ea Motheo
- Tlosa/Tima: Tobetsa ea TSAMAYA / EMETSE button on the front panel or remote.
- Khetho ea Lintho: Sebelisa le KEKETSO selector buttons on the front panel or the remote control to choose your desired audio/video source (e.g., HDMI 1, CD, NET).
- Taolo ea Bolumo: Fetola MOTS'OI VOLUME konopo phanele e ka pele kapa BUKENG +/- likonopo ho remote control.
- Taolo ea Molumo: Sebelisa le BASESE le KHAHLISO knobs on the front panel to adjust the sound characteristics to your preference.
4.2 Network and Wireless Features
The DTM-7 offers a range of network and wireless audio capabilities:
- Litšebeletso tsa ho phallela: Access integrated streaming services such as Tidal, Pandora, Spotify, Deezer, and TuneIn directly from the receiver's menu. A stable internet connection is required.
- Chromecast e hahiloeng ka hare: Cast audio from compatible apps on your smartphone, tablet, or computer directly to the receiver.
- DTS Play-Fi: Enjoy high-quality wireless audio from your mobile device or PC to the receiver and other DTS Play-Fi enabled products.
- AirPlay: Stream audio from your Apple devices (iPhone, iPad, Mac) to the receiver over your home network.
- Bluetooth: Pair your Bluetooth-enabled devices to stream audio wirelessly to the receiver.
4.3 Likhetho tsa ho laola
- Taolo ea Remoutu ea IR: Use the included remote for direct control of all receiver functions. Ensure line of sight to the receiver's IR sensor.
- Integra Control Pro App: Download the free Integra Control Pro app for iOS and Android devices. This app provides comprehensive control over the receiver's functions, including input selection, volume, network features, and settings.
- 3rd Party Control: The DTM-7 supports integration with custom installation systems via IP control or RS232C for advanced home automation.
5. Tlhokomelo
To ensure the longevity and optimal performance of your Integra DTM-7 receiver, follow these maintenance guidelines:
- Ho hloekisa: Gently wipe the exterior surfaces with a soft, dry cloth. Do not use abrasive cleaners, waxes, or solvents, as they can damage the finish.
- Moea oa moea: Ensure adequate ventilation around the receiver. Do not block the ventilation openings on the top or sides. Avoid placing the unit in an enclosed cabinet without proper airflow.
- Ho Tlosa Lerōle: Periodically use a soft brush or a vacuum cleaner with a brush attachment to remove dust from the ventilation grilles.
- Mohala oa Matla: Regularly check the power cord for any signs of damage. If damaged, discontinue use and contact customer support for a replacement.
6. Ho rarolla mathata
If you encounter issues with your DTM-7 receiver, refer to the following common troubleshooting steps:
- Ha ho Matla:
- Ensure the power cord is securely plugged into both the receiver and a working wall outlet.
- Hlahloba hore na sehokelo sa lebota se sebetsa ka ho hokela sesebelisoa se seng.
- Ha ho Molumo:
- Netefatsa hore mohloli o nepahetseng oa ho kenya o khethiloe.
- Hlahloba dikgokelo tsohle tsa sebui bakeng sa polarity e nepahetseng le ho lekana ka mokhoa o sireletsehileng.
- Netefatsa hore modumo ha o a behwa ho bonyane kapa ha o a kgutsufatswa.
- Confirm that your speakers are functional.
- Ha ho Video:
- Ensure the HDMI cables are securely connected to both the source device, the receiver's HDMI IN, and the TV's HDMI OUT.
- Verify that the correct HDMI input is selected on the receiver and the correct HDMI input is selected on your TV.
- Leka thapo e fapaneng ea HDMI kapa koung.
- Mathata a Khokahano ea Marang-rang:
- For wired connections, ensure the Ethernet cable is properly connected to the receiver and your router.
- For Wi-Fi, check your router's status and ensure the receiver is within range. Re-enter Wi-Fi credentials if necessary.
- Qala botjha router ea hau le moamoheli.
- Remote Control ha e sebetse:
- Kenya libeteri sebakeng sa remote control.
- Netefatsa hore ha ho na litšitiso pakeng tsa remote le sensor ea IR ea moamoheli.
If the problem persists after trying these steps, please refer to the Integra support websebaka kapa ikopanye le litšebeletso tsa bareki.
7. Litlhaloso
| Sebopeho | Tlhaloso |
|---|---|
| Sehlahisoa sa Matla | 100 W/Ch. (8 Ohms, 20 Hz-20 kHz, 0.08% THD, 2 Channels Driven, FTC) |
| Litlhahiso/Litlhahiso tsa HDMI | 4 ho / 1 Ho tsoa |
| Likarolo tsa HDMI | 4K/60 Hz, HDR10, HLG, Dolby Vision, BT.2020 Pass-thru, HDCP 2.2, 4:4:4 Color Space, WCG |
| Theknoloji ea Khokahano | AirPlay, Bluetooth, HDMI, Wi-Fi, Ethernet |
| Wireless Audio Features | Chromecast Built-In, DTS Play-Fi, AirPlay, Spotify, Pandora, Tidal, Deezer, TuneIn |
| Mokhoa oa Phatlalatso ea Audio | Setereo |
| Potoloho ea Mohala oa Molumo o Potileng | 2.1 |
| Phono Keketso | Yes (Built-in phono preamp) |
| Mofuta oa Taolo | IR Remote, Android/iOS App (Integra Control Pro), IP, RS232C |
| Litekanyo tsa Lihlahisoa (W x H x D) | 17.1 x 5.9 x 12.9 inches (hoo e ka bang.) |
| Boima ba Ntho | 18.7 liponto |
| Moetsi | Onkyo |
8. Tiisetso le Tšehetso
For detailed warranty information, please refer to the warranty card included with your product or visit the official Integra website. For technical support, product registration, or service inquiries, please contact Integra customer support or visit their official websebaka sa marang-rang bakeng sa tlhahisoleseling ea morao-rao.
Manufacturer: Onkyo


