
1. Selelekela
The SPL 2Control is a compact and user-friendly stereo monitor controller designed to provide comprehensive control over your digital audio workstation's (DAW) monitoring functions. It ensures high-quality audio reproduction through both studio monitors and headphones, allowing you to hear every detail of your mix. Key features include a precise speaker volume potentiometer, active circuitry for sound integrity, and a unique Crossfeed control for accurate headphone monitoring that simulates a stereo speaker image.
2. Litaelo tsa Tšireletso
- Read these instructions thoroughly before operating the device.
- Boloka bukana ena bakeng sa tšebeliso ea nako e tlang.
- Se ke oa pepesetsa yuniti pula kapa mongobo ho thibela mollo kapa ts'ebetso ea motlakase.
- Etsa bonnete ba hore ho na le moea o nepahetseng; u se ke ua thiba masoba leha e le afe a moea.
- Sebelisa feela liphutheloana/lisebelisoa tse boletsoeng ke moetsi.
- Hakolla thapo ea motlakase nakong ea lifefo tsa lehalima kapa ha e sa sebelisoe nako e telele.
- Fetisetsa lits'ebeletso tsohle ho basebetsi ba tšoanelehang.
- Qoba ho beha yuniti haufi le mehloli ea mocheso joalo ka li-radiator, li-heat registers, li-stove, kapa lisebelisoa tse ling (ho kenyeletsoa amplifiers) tse hlahisang mocheso.
3. Likahare tsa Sephutheloana
Upon unpacking, please verify that the following items are included:
- 1 x SPL 2Control Module
- 1 x Mohala oa Matla
- Bukana ena ea mosebelisi
4. Sehlahisoa Overview
4.1 Litaolo le Lipontšo tsa Phanele e ka Pele
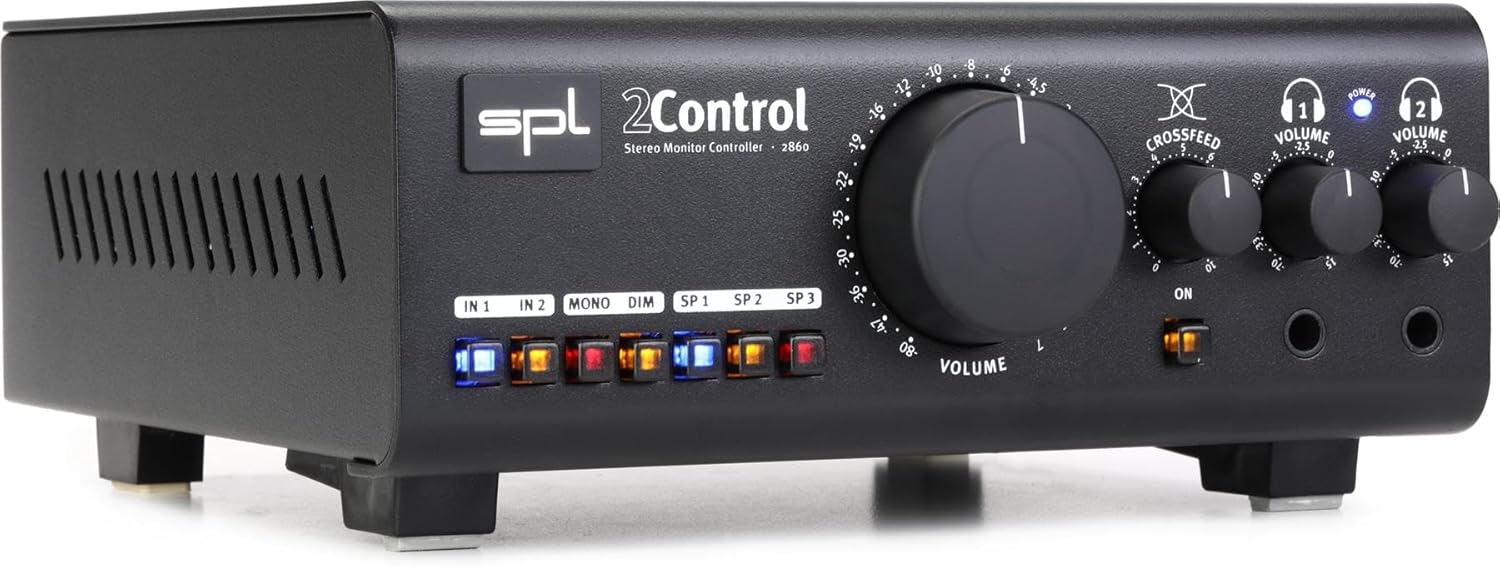
Setšoantšo sa 1: Front Panel of the SPL 2Control Stereo Monitor Controller.
This image displays the front panel of the SPL 2Control. From left to right, it features input selection buttons (IN 1, IN 2), function buttons (MONO, DIM), speaker output selection buttons (SP 1, SP 2, SP 3), a large central master VOLUME knob, a CROSSFEED knob, and two individual headphone VOLUME knobs with corresponding headphone output jacks. A power indicator LED is visible above the headphone controls.
- IN 1 / IN 2 Buttons: Selects the active stereo input source.
- MONO Button: Sums the stereo signal to mono for compatibility checking.
- Konopo ea DIM: Reduces the output volume by a fixed amount (e.g., -20dB) for temporary level reduction.
- SP 1 / SP 2 / SP 3 Buttons: Selects the active stereo speaker output pair.
- VOLUME Kotola: Master volume control for selected speaker outputs.
- CROSSFEED Knob: Adjusts the stereo panorama for headphone monitoring to simulate a speaker listening environment.
- HEADPHONE VOLUME 1 / 2 Knobs: Independent volume controls for the two headphone outputs.
- HEADPHONE 1 / 2 Jacks: 1/4-inch stereo headphone outputs.
- MATLA LED: Indicates the unit is powered on.
4.2 Rear Panel Connections (Inferred)
The rear panel typically houses the audio input and output connections, as well as the power input. Based on common audio equipment and product specifications, you can expect:
- Litlhahiso tsa Analog: Balanced XLR or TRS inputs for connecting your audio interface or mixer.
- Liphetho tsa sebui: Multiple sets of balanced XLR or TRS outputs for connecting up to three pairs of studio monitors.
- Kenyeletso ea Matla: Connector for the included power cord.
5. Seta
- Sebaka: Position the SPL 2Control on a stable, flat surface, ensuring adequate ventilation around the unit.
- Khokelo ea Matla: Connect the provided power cord to the power input on the rear panel of the 2Control and then to a suitable AC power outlet.
- Lihokelo tse Kenyelitsoeng: Connect the stereo outputs of your audio interface, mixer, or other audio source to the IN 1 and/or IN 2 inputs on the rear panel using balanced XLR or TRS cables.
- Lihokelo tsa Sebui: Connect your studio monitors to the SP 1, SP 2, and/or SP 3 outputs on the rear panel using balanced XLR or TRS cables. Ensure correct left and right channel connections.
- Headphone Connections: Plug your headphones into the HEADPHONE 1 and/or HEADPHONE 2 jacks on the front panel.
- Motlakase oa Pele o Buletsoe: Ensure all volume controls are set to their minimum positions before powering on the unit. Then, connect the power cord to the wall outlet. The POWER LED on the front panel will illuminate.
6. Litaelo tsa Ts'ebetso
- Ho khetha se kentsoeng: Tobetsa kapa ho HO 1 or HO 2 button to select your desired audio source. The active button will illuminate.
- Selecting Speaker Outputs: Tobetsa ea EA-1-SP, EA-2-SP, kapa EA-3-SP button to route the audio to the corresponding pair of studio monitors. Only one speaker output can be active at a time.
- Ho Fetola Molumo o Moholo: Slowly turn the large BOLUMO knob clockwise to increase the listening level for the selected speaker outputs. Turn counter-clockwise to decrease.
- Mono Summing: Tobetsa ea MONO button to sum the stereo signal to mono. This is useful for checking phase compatibility and mix balance. Press again to return to stereo.
- Mosebetsi oa Dim: Tobetsa ea DIM button to temporarily reduce the output volume. This is useful for quick conversations or when you need to lower the volume without losing your main volume setting. Press again to restore the original volume.
- Tlhokomelo ea Li-headphone:
- Plug your headphones into the desired headphone jack (HEADPHONE 1 or 2).
- Adjust the individual HEADPHONE VOLUME 1 or 2 knob to set the listening level for your headphones.
- Sebelisa le TŠEPANE knob to adjust the stereo image for headphone listening. Turning it clockwise increases the crossfeed, simulating a more natural speaker-like stereo field by blending the left and right channels slightly.
7. Tlhokomelo
- Ho hloekisa: Use a soft, dry cloth to clean the exterior of the unit. Do not use liquid cleaners or solvents.
- Moea oa moea: Ensure that the ventilation slots are kept clear of dust and debris to prevent overheating.
- Polokelo: Haeba u boloka yuniti ka nako e telele, e tlose motlakaseng 'me u e boloke sebakeng se pholileng, se omileng.
8. Ho rarolla mathata
| Bothata | Lebaka le ka khonehang | Tharollo |
|---|---|---|
| Ha ho molumo o tsoang ho libui. |
|
|
| Ha ho na molumo o tsoang ho li-headphones. |
|
|
| Molumo o sothehileng. |
|
|
9. Litlhaloso
| Sebopeho | Lintlha |
|---|---|
| Lebitso la Mohlala | 2 Control (also known as 2860) |
| Brand | SPL |
| Mofuta oa Sebui | Hlokomela |
| Litšebeliso tse khothalelitsoeng | Control, Volume for Monitors |
| Lisebelisoa tse lumellanang | Monitors, Speakers |
| Potoloho ea Mohala oa Molumo o Potileng | 2.0 |
| Mmala | Ntsho |
| Kenyellelitsoe Likaroloana | 1 x SPL Control Module |
| Litekanyo tsa Sehlahisoa (D x W x H) | 8.66" x 8.46" x 3.15" |
| Boima ba Ntho | 7.06 pounds (hoo e ka bang 3.2kg) |
| Mohloli oa Matla | Motlakase oa Corded |
| Theknoloji ea Khokahano | TRS, XLR |
| Mokhoa oa Phatlalatso ea Audio | Setereo |
| Mofuta oa ho Beha | Thaba ea Letlapa |
| Moetsi | Sound Performance Lab |
10. Tiisetso le Tšehetso
The SPL 2Control Monitor Controller comes with a limited warranty. For specific warranty terms, duration, and conditions, please refer to the documentation provided with your purchase or visit the official SPL website. For technical support, service, or inquiries, please contact the manufacturer, Sound Performance Lab, or your authorized dealer.
Moetsi: Sound Performance Lab