
1. Sehlahisoa Overview
The Technoline WS 6810 amber Weather Station is a sophisticated device designed to provide accurate indoor and outdoor temperature readings, precise timekeeping via DCF-77 radio control, and convenient alarm functions. Its modern design with a warm amber LED display and black high-gloss finish integrates seamlessly into any contemporary home environment. This manual provides detailed instructions for setting up, operating, and maintaining your weather station.

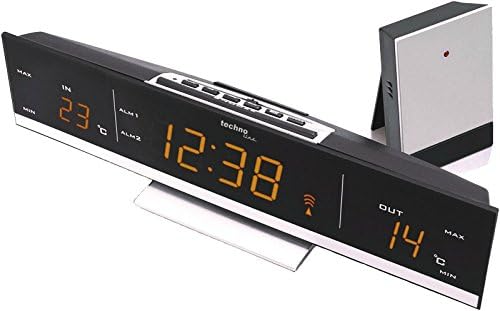
Setšoantšo sa 1.1: Pele view of the Technoline WS 6810 Weather Station, displaying indoor and outdoor temperatures, current time, and alarm indicators.
2. Likahare tsa Sephutheloana
Please check the package contents carefully. If any items are missing or damaged, contact your retailer immediately.
- 1 x Technoline WS 6810 Temperature Station (Main Unit)
- 1 x TX96 (TW004) Outdoor Sensor
- 1 x Power Supply Unit (220V)
- 1 x Buka ea Mosebelisi (tokomane ena)
Hlokomela: 3 x AAA Micro LR03 batteries for main unit backup and 2 x AAA Micro LR03 batteries for the outdoor sensor are ha e kenyelelitsoe mme e tlameha ho rekoa ka thoko.

Figure 2.1: The Technoline WS 6810 main unit alongside its TX96 outdoor sensor.
3. Likarolo tsa Bohlokoa
- DCF-77 Radio-Controlled Clock: Automatic time synchronization for precise timekeeping. Includes manual setting option and time zone adjustment (± 1 hour).
- Indoor and Outdoor Temperature Display: Monitors and displays current temperatures for both indoor and outdoor environments.
- Memori ea Mocheso oa Min / Max: Records and displays the highest and lowest temperatures measured.
- Dual Alarm Clocks: Two independent alarms (ALM1, ALM2) with adjustable settings.
- Mosebetsi: Provides a temporary pause for alarms, typically 5 minutes.
- Khanya ea Pontšo e Fetohang: Two brightness levels for optimal visibility in various lighting conditions.
- Sebaka sa Letlapa: Integrated stand for convenient desktop placement.
- Pontšo ea LED: Clear, warm amber LED digits for easy readability.
4. Tataiso ea ho seta
4.1. Ho fa Yuniti e ka Sehloohong matla
- Connect the provided power supply unit to the DC IN port on the back of the WS 6810 main unit.
- Plug the power adapter into a standard 220V electrical outlet. The display will illuminate.
- For backup power during outages, insert 3 x AAA Micro LR03 batteries (not included) into the battery compartment on the back of the main unit, observing polarity (+/-).
4.2. Installing Batteries in the Outdoor Sensor (TX96)
- Open the battery compartment on the back of the TX96 outdoor sensor.
- Insert 2 x AAA Micro LR03 batteries (not included), ensuring correct polarity.
- Koala kamore ea betri ka mokhoa o sireletsehileng.
4.3. Initial Synchronization and Sensor Placement
- Place the outdoor sensor within effective transmission range (typically up to 30 meters in open air) of the main unit. Avoid placing it near large metal objects, electrical appliances, or direct sunlight.
- The main unit will automatically attempt to receive the DCF-77 radio signal for time synchronization and connect with the outdoor sensor. This process may take several minutes. A signal icon will appear on the display once synchronization is successful.
- If the outdoor temperature does not appear after a few minutes, press the "SENSOR" button on the main unit to manually initiate a search for the outdoor sensor.
4.4. Time Zone Setting (if required)
If you are in a region where the DCF-77 signal's standard time differs from your local time (e.g., outside Central European Time), you may need to adjust the time zone.
- In normal time display mode, press and hold the "SET" button until the time zone offset flashes.
- Use the "+" or "-" buttons to adjust the time zone offset in ±1 hour increments.
- Press "SET" again to confirm and exit.
Setšoantšo sa 4.1: Holimo view of the WS 6810, highlighting the control buttons for setup and operation.
5. Litaelo tsa Ts'ebetso
5.1. Boitsebiso ba Pontšo
The large LED display shows the following information:
- HO: Mocheso oa ka tlung.
- HO TSOA: Outdoor temperature (from TX96 sensor).
- Nako: Current time (radio-controlled).
- ALM1 / ALM2: Indicators for Alarm 1 and Alarm 2.
- Letšoao la Letšoao: Indicates successful DCF-77 signal reception.
- MIN / MAX: Indicators for minimum and maximum temperature records.
5.2. Ho beha li-alamo
The WS 6810 features two independent alarms (ALM1 and ALM2).
- Press the "ALARM" button repeatedly to cycle through ALM1, ALM2, and normal time display.
- When ALM1 or ALM2 is displayed, press and hold the "ALARM" button until the alarm time flashes.
- Use the "+" or "-" buttons to adjust the hour, then press "ALARM" to confirm and move to minutes.
- Use the "+" or "-" buttons to adjust the minutes, then press "ALARM" to confirm.
- To activate/deactivate an alarm, select ALM1 or ALM2 display, then press the "+" button. An alarm icon will appear/disappear.
5.3. Mosebetsi oa ho Khutsisa
When an alarm sounds, press the "SNOOZE/LIGHT" button to activate the snooze function. The alarm will temporarily stop and sound again after approximately 5 minutes.
5.4. Ho Fetola Khanya ea Pontšo
Press the "SNOOZE/LIGHT" button (when no alarm is sounding) to toggle between the two available brightness levels for the LED display.
5.5. Viewing Min/Max Temperatures
Press the "MIN/MAX" button to cycle through the current, maximum, and minimum recorded indoor and outdoor temperatures. To reset the min/max records, press and hold the "MIN/MAX" button while the min/max values are displayed.
6. Tlhokomelo
- Ho hloekisa: Wipe the main unit and outdoor sensor with a soft, damp lesela. Se ke oa sebelisa li-abrasive cleaners kapa solvents.
- Phetoho ea Betri: Replace batteries in the outdoor sensor and main unit (for backup) when the low battery indicator appears on the display or when performance degrades. Always replace all batteries of a set at the same time.
- Sebaka sa Sensor: Periodically check the outdoor sensor's placement to ensure it is protected from direct sunlight and heavy precipitation for accurate readings and longevity.
- Polokelo: Haeba o boloka sesebediswa nako e telele, tlosa dibetri tsohle ho thibela ho dutla.
7. Ho rarolla mathata
| Bothata | Lebaka le ka khonehang | Tharollo |
|---|---|---|
| Ha ho pontsho yuniti e ka sehloohong. | Power adapter not connected or faulty; batteries (backup) are dead or incorrectly inserted. | Ensure power adapter is securely plugged in. Check and replace backup batteries, ensuring correct polarity. |
| Outdoor temperature not displayed or inaccurate. | Outdoor sensor batteries are dead; sensor out of range; interference; sensor not paired. | Replace outdoor sensor batteries. Move sensor closer to the main unit. Avoid placing near electronics. Press "SENSOR" button on main unit to re-establish connection. |
| Nako ha e nepahale kapa ha e tsamaisane. | Weak DCF-77 signal; interference; incorrect time zone setting. | Relocate the main unit to an area with better signal reception (e.g., near a window, away from electronics). Check time zone setting. Manual time setting is available if radio control fails. |
| Alamo ha e lle. | Alarm is not activated; alarm volume too low (not applicable for this model, but common issue). | Ensure the alarm icon (ALM1 or ALM2) is displayed, indicating activation. Re-set the alarm time. |
8. Lintlha tsa Setegeniki
| Mohlala | WS 6810 amber |
| Litekanyo tsa Yuniti e ka Sehloohong (L x W x H) | 28.5 x 7 x 5.5 cm (hoo e ka bang 11.2 x 2.8 x 2.2 inch) |
| Boima ba Karolo e ka Sehloohong | 500 g (hoo e ka bang 1.1 lbs) |
| Outdoor Sensor (TX96) Dimensions (L x W x H) | 50 x 22 x 104 mm (hoo e ka bang 2.0 x 0.9 x 4.1 inches) |
| Power Supply (Main Unit) | 220V AC Power Adapter (included) |
| Backup Power (Main Unit) | Libetri tse 3 tsa AAA Micro LR03 (ha li kenyelelitsoe) |
| Phepelo ea Matla (Sensor ea Kantle) | Libetri tse 2 tsa AAA Micro LR03 (ha li kenyelelitsoe) |
| Mofuta oa Pontšo | LED (Amber) |
| Kamahanyo ya nako | DCF-77 Radio Controlled |
| Maemo a Thempereichara (Ka Hare) | (Information not provided, typical range is 0°C to 50°C) |
| Maemo a Thempereichara (Kantle) | (Information not provided, typical range is -20°C to 60°C) |
9. Tiisetso le Tšehetso
Technoline products are manufactured to high quality standards. For warranty information, technical support, or service inquiries, please contact your retailer or visit the official Technoline websebaka.
Leqephe la Sehlahisoa sa Semmuso: http://www.technoline.eu/products/en/4029665068107
Ka kopo, boloka bopaki ba theko ea hau bakeng sa likopo tsa tiisetso.